Friday, December 25, 2009

Gingerbread Alamo


The December 2009 Daring Bakers’ challenge was brought to you by Anna of Very Small Anna and Y of Lemonpi. They chose to challengeDaring Bakers’ everywhere to bake and assemble a gingerbread house from scratch. They chose recipes from Good Housekeeping and from The Great Scandinavian Baking Book as the challenge recipes.
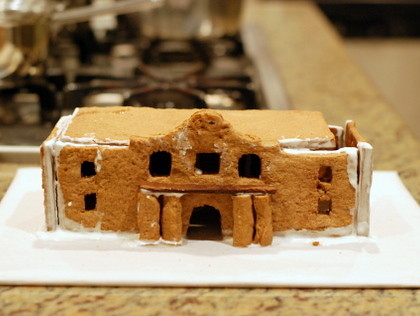
Merry Christmas from Texas! This year Tim and I are celebrating the birth of Jesus with my side of the family in Houston, and we've been having fun with our traditions of puzzle making, carol singing, and eating everything in sight. I took a break from the puzzles by making this gingerbread Alamo for this month's well-timed Daring Bakers' challenge.

I take no credit for the idea. Lisa of the Homesick Texan blogged about her gingerbread Alamo a few days ago, and I used her awesome templates for this challenge. Lisa and I have a few things in common: we reside in New York, home to us is Houston, our first gingerbread structure was made this year, and that structure would be the Alamo covered in snow. I'm actually headed to San Antonio this weekend, and I'll double check, but somehow I doubt it's covered in snow. Looking back, I should have used simple syrup instead of royal icing for the glue. Royal icing does not hide well.

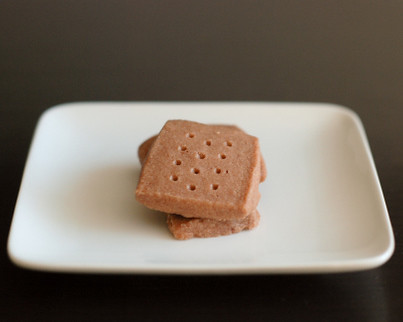
I snacked on the bits of the gingerbread, and I was not a fan. It seemed to be too dry and lacked not only the chewy texture but some flavor as well. It made for a decent structure, but I would not recommend making it for taste.

I hope y'all had a wonderful Christmas today. I love the holiday because of its meaning and also for the quality time I get to spend with family. I'm off to get back to them and the puzzles!


Scandinavian Gingerbread (Pepparkakstuga)
from The Great Scandinavian Baking Book by Beatrice Ojakangas

Ingredients:
1 cup butter, room temperature
1 cup brown sugar, well packed
2 tablespoons cinnamon
4 teaspoons ground ginger
3 teaspoons ground cloves
2 teaspoons baking soda
1/2 cup boiling water
5 cups all-purpose flour
Gingerbread Alamo templates

Directions:
1. In a large bowl, cream the butter and sugar until blended. Add the cinnamon, ginger and cloves. Mix the baking soda with the boiling water and add to the dough along with the flour. Mix to make a stiff dough. If necessary add more water, a tablespoon at a time. Chill 2 hours or overnight.
2. When ready to bake, preheat oven to 375 degrees F.
3. Cut patterns for the Alamo: front, 4 sides, back, and roof.
4. Roll the dough out on a large, ungreased baking sheet and place the patterns on the dough.
5. Mark off the various pieces with a knife and cut shapes out of dough. Place on baking sheet and chill in refrigerator until dough hardens slightly, about 5-10 minutes.
6. Take baking sheet out of refrigerator and bake for 12 to 15 minutes until the cookie dough feels firm. After baking, trim edges to make straight if necessary. Let gingerbread completely cool before assembling.


Royal Icing
Ingredients:
1 large egg white
3 cups powdered sugar
1 teaspoon white vinegar
1 teaspoon almond extract

Directions:
1. Beat all liquid ingredients until smooth.
2. Add the powdered sugar gradually to get the desired consistency.


Assembling the Alamo
Directions:
1. Wrap a large piece of cardboard with parchment for the Alamo grounds.
2. Generally apply royal icing to bottom of the front Alamo wall, hold it in place on the parchment covered cardboard until it stands on its own.
3. Continue the process with the four side pieces (two go in the middle to support the roof) and the back. Let the royal icing dry on the Alamo.
4. Add the roof, generously applying more icing between cracks. Hold in place until dry, using cans if you have to.

Friday, December 18, 2009

Ovaltine Shortbread Cookies


Today's post is my 100th post on Talida Bakes! That means in the past three years, I've baked nearly 100 new recipes. I know that may not be a lot to some of you, but it's an accomplishment to me, to know that my hobby and passion has only grown stronger since I started this blog.

I wanted to make a cookie that meant something special to me, so I came up with Ovaltine shortbread. Ovaltine is my absolute favorite childhood drink. I associate it primarily with my visits to my grandparents in Thailand, and I keep a jar of the stuff in my cabinet when I want to taste my maternal grandmother's kitchen. I drink it with condensed milk, and on one visit to Thailand, I mistook an unlabeled squeeze bottle of mayonnaise for condensed milk. I drank that Ovaltine-mayonnaise concoction for two days before realizing why my Ovaltine tasted off. It tasted much worse after I knew what I had done, and now I double check before adding anything to my Ovaltine.

I also mailed these cookies off to my group for Vané's Brooklyn Bride Card Swap - hope you enjoyed them, ladies! And here's hoping my next 100 posts won't take another three years!


Ovaltine Shortbread Cookies
adapted from previous recipe

Ingredients:
1 cup unsalted butter, room temperature
2/3 cup confectioners’ sugar
1/2 teaspoon pure vanilla extract
1/4 cup Ovaltine
2 cups all-purpose flour
1/8 teaspoon salt

Directions:
1. With a stand mixer, beat the butter and confectioners’ sugar together on medium speed for about 3 minutes, until the mixture is smooth. Beat in the vanilla and reduce the mixer speed to low.
2. Sift together flour, Ovaltine, and salt, then add to butter mixture, mixing only until it disappears into the dough. Don’t work the dough much once the flour is incorporated.
3. Using the spatula, transfer the soft, sticky dough to a gallon-size zipper-lock plastic bag. Put the bag on a flat surface, leaving the top open, and roll the dough into a 9 x 10 1/2 inch rectangle that’s 1/4 inch thick. As you roll, turn the bag occasionally and lift the plastic from the dough so it does not cause creases. When you get the right size and thickness, seal the bag, pressing out as much air as possible, and refrigerate the dough for at least 2 hours, or for up to 2 days.
4. Position the racks to divide the oven into thirds and preheat the oven to 325 degrees F. Line two baking sheets with parchment or Silpat.
5. Put the plastic bag on a cutting board and slit it open. Turn the firm dough out onto the board (discard the bag) and, using a ruler as a guide and a sharp knife, cut the dough into 1 inch squares. Transfer the squares to the baking sheets and carefully prick each one four times with a fork, gently pushing the tines through the cookies until they hit the sheet.
6. Bake for 18 to 20 minutes, rotating the sheets from top to bottom and front to back at the midway point. Transfer the cookies to a rack to cool. This recipe makes about 40 cookies.

Friday, December 11, 2009

Molten Chocolate Cake


My dear husband's birthday fell on the Sunday after Thanksgiving this year, which meant we got to celebrate with his side of the family while they were in town for the holiday. We ate some noodles together, not the specific longevity noodles dish, but it still symbolized our wish for longevity in Tim's life. In addition to the noodles, I cooked him a breakfast of Thanksgiving leftovers including fried cornbread stuffing cakes, fried chorizo, and fried eggs. Hmm, after typing that out, I suppose my breakfast canceled out the longevity wishes.

Lastly, we celebrated his birthday with these molten chocolate cakes. This guy loves his dark chocolate, so I gave it to him in this oozy cake form. Molten chocolate cakes are really just undercooked brownies, so I used Tim's birthday recipe from two years ago and put it to the test. I halved the recipe (made some slight modifications), put the batter into ramekins, cut down the baking time, and out came these great cakes. Inverting the cakes was harder than I thought, so after the first one fell apart during the process, I decided to keep the rest in their ramekins. If anyone has a trick to keep them intact, I'd love to hear it!


Molten Chocolate Cake
adapted from previous recipe

Ingredients:
1/2 cup unsalted butter + 1-2 tablespoons unsalted butter for the ramekins
4 ounces dark chocolate (Valrhona 70%)
2 eggs
2 egg yolks
1/4 cup sugar
2 teaspoons flour + flour for dusting

Directions:
1. Preheat oven to 425 degrees F. Butter 4 ramekins (4-ounce) and lightly flour.
2. In a double boiler, melt together the butter with the chocolate.
3. Beat together the eggs, egg yolks, and sugar while chocolate and butter mixture is still melting. Pour egg mixture into the melted chocolate along with the flour and quickly beat until just combined.
4. Divide batter into ramekins. (To bake at a later time, store cakes in the fridge, and bring back to room temperature before baking) Bake for 10 minutes until the sides are set while the center is still soft.
5. To serve without ramekin, invert ramekin onto a plate and let sit for a few minutes. Lift mold carefully so the cake should fall out on plate. Serve immediately.

Friday, December 4, 2009

Pumpkin Chiffon Dessert


Yikes, this "pie" is not photogenic at all. I don't even know what to call this dessert. I initially intended on making a pumpkin chiffon pie, but a few things got in the way. As usual, let me throw out a bunch of excuses to explain myself.

Excuse #1: I couldn't make a proper pie because I couldn't find my pie pan. Last time I baked a pie was fall 2003. I've moved 7 times among 3 states since then, so is it any wonder it's missing?

Excuse #2: I tried to make mini-pies in my mini-muffin pan, but the shells didn't hold up. Note below in step 2 where it says "Let cool 5 minutes." I let them cool for something like 30 minutes. They cooled completely and stuck to the pan, so I had to crush them to get them out. That's when I decided to use some nut cups and make individual trifle-like desserts.

Excuse #3: I didn't photograph this until this morning, so the filling had all week to dry out while turning the crust into mush. No one will be eating this dessert.

With that out of the way, let me say that these still tasted pretty good. An added benefit was that it was so easy to serve! This makes a great pumpkin pie alternative, and had it been in pie form, I'm sure it would photograph lovely.


Pumpkin Chiffon Dessert
adapted from Martha Stewart

Crust Ingredients:
32 gingersnaps, coarsely broken
1/4 cup granulated sugar
1/4 teaspoon coarse salt
4 tablespoons plus 2 teaspoons unsalted butter, melted

Filling Ingredients:
1 envelope unflavored gelatin (1 tablespoon)
1/4 cup cold water
1 1/4 cups canned pumpkin
3 large eggs, separated
3/4 cup granulated sugar
1/2 cup whole milk
1/4 teaspoon coarse salt
1/2 teaspoon ground cinnamon
1/4 teaspoon ground ginger
1/8 teaspoon ground nutmeg

Directions:
1. Preheat oven to 350 degrees F. Process gingersnaps, granulated sugar, and salt in a food processor until finely ground. Add butter, and process until combined.
2. Divide mixture among mini-muffin pan, pressing into bottom and up sides. Place on a baking sheet, and bake until darkened and firm, 11 to 13 minutes. Let cool 5 minutes. Using an offset spatula, carefully unmold crusts, and return to sheet to cool.
3. Sprinkle gelatin over cold water in a bowl. Let stand until softened, about 5 minutes.
4. Combine pumpkin, egg yolks, 1/4 cup granulated sugar, milk, salt, and spices in a saucepan over medium heat. Cook, stirring, until mixture begins to thicken, about 8 minutes. Do not boil. Remove from heat. Stir in gelatin mixture until dissolved. Let cool completely.
5. Beat egg whites with a mixer until soft peaks form. Gradually add remaining 1/2 cup granulated sugar, beating until stiff peaks form.
6. Whisk one-third of beaten egg whites into cooled pumpkin mixture. Gently fold in remaining whites. (Filling can be refrigerated, covered, overnight.) Spoon into pie shells, and refrigerate for at least 1 hour or up to 2 hours.