Congratulations, Steve and Alice! Yesterday afternoon, my friends' first child Nathaniel came into the world, and I can't wait to meet the little guy. I helped host their baby shower back in December, and I can't believe he's already here!
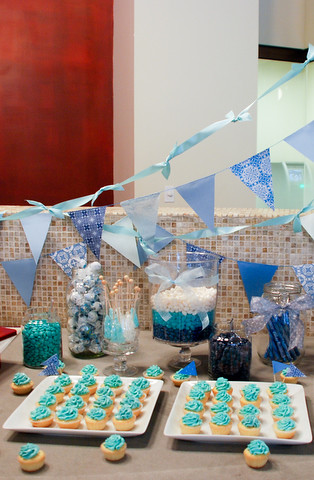
It's always an honor to help out with showers, and I had a blast working with my usual party-planning-partner Cheryl to decorate the lounge in my building for the ocassion. Pennant banners have popped up all around the blogosphere over the past year, and we wanted in on the fun. We combined various shades, prints, and textured blue paper with knotted ribbon to decorate the dessert and candy bar area. Alice's sister Nancy arranged an assortment of blue and white candies for guests to take home, and I made vanilla bean mini-cupcakes iced with blue vanilla frosting. Did I mention they had a boy?
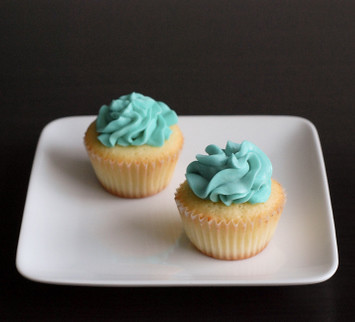
I don't regularly make cupcakes, but I was happy to make a classic vanilla bean cupcake dressed in blue for the occasion. I reduced the sugar amount in both cake and frosting recipes, but they were just sweet enough and full of vanilla flavor. Vanilla is anything but plain, amen? Here's the recipe.
Vanilla Bean Cupcakes
Ingredients:
1 cup unsalted butter, softened
1 1/2 cups sugar
4 large eggs
3 cups flour
1 1/2 teaspoons baking powder
1/4 teaspoon salt
1 cup milk
2 vanilla beans, seeds scraped out
Directions:
1. Preheat oven to 350F degrees.
2. Line mini-muffin tin with mini-cupcake papers.
3. Beat butter, add sugar and beat until light and fluffy, about 3 minutes.
4. Add eggs, one at a time, and beat until well combined.
5. Sift together flour, baking powder, and salt into a medium bowl.
4. In a separate medium bowl, scrape out the vanilla bean seeds and stir into the milk.
5. Using the alternating wet/dry method, add flour mixture and milk mixture into the butter mixture, a third at a time. Continue adding dry and wet ingredients until finishing with the dry.
6. Spoon batter into tin, filling about 2/3's full. Bake cupcakes for about 13-15 minutes or until a toothpick comes out clean. Makes about 60 mini cupcakes.
Vanilla Frosting
adapted from Cook's Illustrated
Ingredients:
2 tablespoons heavy cream
1 teaspoon vanilla extract
pinch table salt
2 1/2 sticks unsalted butter, softened
2 cups confectioners' sugar
few drops blue food color gel
Directions:
1. Stir the cream, vanilla, and salt together in a small bowl until the salt dissolves.
2. Beat the butter with an electric mixer on medium-high speed until smooth, 30 to 60 seconds.
3. Reduce the speed to medium-low, slowly add the confectioners' sugar, and beat until smooth, 2 to 5 minutes. Beat in the cream mixture. At this point add in the blue food color gel. Add gel one drop at a time until reaching desired color.
4. Increase the speed to medium-high and beat until the mixture is light and fluffy, 4 to 8 minutes.
5. The frosting can be made up to 2 days ahead and refrigerated, wrapped tightly in plastic wrap. Before using, let stand at room temperature to soften, then whisk briefly to re-fluff. Makes about 3 cups.