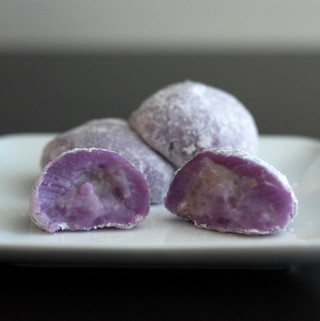
Last week's post featured the taro bread I made after reminiscing the food I grew up with in Houston. This week I took the same taro paste recipe and used it in this taro mochi. I've made mochi a time or two before, but I never successfully made a filled mochi until now.
There are so many different ways to eat mochi, I really can't pick a favorite way. I primarily make a simple sweet mochi to top my homemade frozen yogurt, but last year I started frying blocks of plain mochi, wrapping it in seaweed and dipping it in soy sauce for a delicious savory snack.
When making a filled mochi, you have to work fast to get it completely enclosed around the filling. A lot of pinching is involved to seal the ball, and I recommend being liberal with the potato starch to minimize the amount of mochi stuck to your hands.
You'll notice my mochi is purple, and that's because I added in some taro milk tea powder. I did so for an extra oomph of taro flavor, but also so that you can tell what kind of mochi it is by its color. That, and I do love the color purple.
Taro Mochi
Ingredients:
1 cup Mochiko sweet rice flour
1 Tb taro milk tea powder (as used in taro mousse)
1 cup water
1/4 cup sugar
1/2 cup taro paste (described in taro bread recipe)
potato starch, for dusting
Directions:
1. In a medium bowl, mix mochiko, taro powder, and sugar. Add in water and combine thoroughly.
2. Spread mochi mixture in 9 x 11 Pyrex or other microwaveable dish. Cover with plastic wrap.
4. Microwave on high for 4 minutes. Take off plastic wrap and let cool about 4 minutes. Mochi should still be warm yet cool enough to handle.
5. Cut mochi into 12 large squares (roughly 2"x2").
6. Taking one square at a time, spoon 1/2 teaspoon of taro paste in the middle of moch square. Pinch edges together to seal and mold mochi into a ball. Dust immediately with potato starch to prevent sticking.

delicious!
ReplyDeleteI love taro mochi!
ReplyDeleteThank you for the recipe, I'm going to try to make them : )