Showing posts with label cupcakes. Show all posts

Monday, January 25, 2010

Welcome, Baby Nathaniel!


Congratulations, Steve and Alice! Yesterday afternoon, my friends' first child Nathaniel came into the world, and I can't wait to meet the little guy. I helped host their baby shower back in December, and I can't believe he's already here!

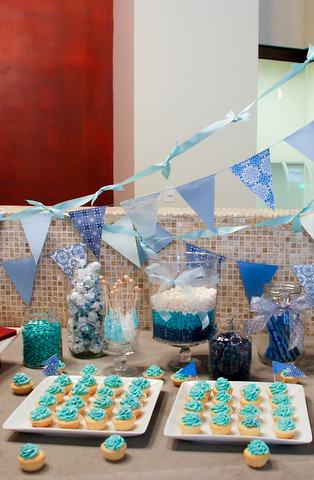
It's always an honor to help out with showers, and I had a blast working with my usual party-planning-partner Cheryl to decorate the lounge in my building for the ocassion. Pennant banners have popped up all around the blogosphere over the past year, and we wanted in on the fun. We combined various shades, prints, and textured blue paper with knotted ribbon to decorate the dessert and candy bar area. Alice's sister Nancy arranged an assortment of blue and white candies for guests to take home, and I made vanilla bean mini-cupcakes iced with blue vanilla frosting. Did I mention they had a boy?
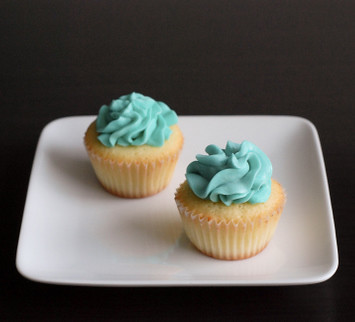


I don't regularly make cupcakes, but I was happy to make a classic vanilla bean cupcake dressed in blue for the occasion. I reduced the sugar amount in both cake and frosting recipes, but they were just sweet enough and full of vanilla flavor. Vanilla is anything but plain, amen? Here's the recipe.


Vanilla Bean Cupcakes

Ingredients:
1 cup unsalted butter, softened
1 1/2 cups sugar
4 large eggs
3 cups flour
1 1/2 teaspoons baking powder
1/4 teaspoon salt
1 cup milk
2 vanilla beans, seeds scraped out

Directions:
1. Preheat oven to 350F degrees.
2. Line mini-muffin tin with mini-cupcake papers.
3. Beat butter, add sugar and beat until light and fluffy, about 3 minutes.
4. Add eggs, one at a time, and beat until well combined.
5. Sift together flour, baking powder, and salt into a medium bowl.
4. In a separate medium bowl, scrape out the vanilla bean seeds and stir into the milk.
5. Using the alternating wet/dry method, add flour mixture and milk mixture into the butter mixture, a third at a time. Continue adding dry and wet ingredients until finishing with the dry.
6. Spoon batter into tin, filling about 2/3's full. Bake cupcakes for about 13-15 minutes or until a toothpick comes out clean. Makes about 60 mini cupcakes.


Vanilla Frosting
adapted from Cook's Illustrated

Ingredients:
2 tablespoons heavy cream
1 teaspoon vanilla extract
pinch table salt
2 1/2 sticks unsalted butter, softened
2 cups confectioners' sugar
few drops blue food color gel

Directions:
1. Stir the cream, vanilla, and salt together in a small bowl until the salt dissolves.
2. Beat the butter with an electric mixer on medium-high speed until smooth, 30 to 60 seconds.
3. Reduce the speed to medium-low, slowly add the confectioners' sugar, and beat until smooth, 2 to 5 minutes. Beat in the cream mixture. At this point add in the blue food color gel. Add gel one drop at a time until reaching desired color.
4. Increase the speed to medium-high and beat until the mixture is light and fluffy, 4 to 8 minutes.
5. The frosting can be made up to 2 days ahead and refrigerated, wrapped tightly in plastic wrap. Before using, let stand at room temperature to soften, then whisk briefly to re-fluff. Makes about 3 cups.

Friday, June 26, 2009

Dark Chocolate Cupcakes


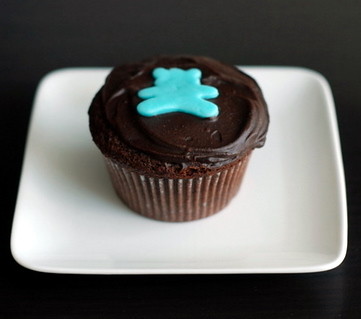
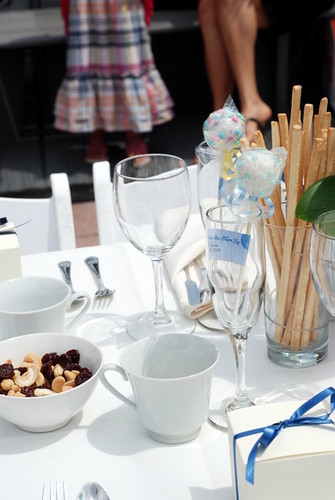
Like I promised, this will be my last post from the baby shower series. Inside the boxes set on the table were these adorable cupcakes as shower favors. Since the mother-to-be is expecting a boy, I decorated the cupcakes by placing little blue fondant animal cut-outs in the middle of the chocolate frosting.

One thing to note about this recipe is that it does double very well. Cooks Illustrated recommended making two separate batches and baking each separately as to not compromise the cupcakes' rise. Another tip for cupcakes is to refrigerate them unfrosted overnight, then let them come to room temperature before frosting and serving. This helps give cupcakes that moist texture that make biting into a cupcake so enjoyable.


Dark Chocolate Cupcakes
from Cooks Illustrated

Ingredients:
8 tablespoons unsalted butter, cut into 4 pieces
2 ounces bittersweet chocolate, chopped
1/2 cup Dutch-processed cocoa
3/4 cup flour
1/2 teaspoon baking soda
3/4 teaspoon baking powder
2 large eggs
3/4 cup sugar
1 teaspoon vanilla extract
1/2 teaspoon salt
1/2 cup sour cream

Directions:
1. Adjust oven rack to lower-middle position; heat oven to 350 F degrees. Line standard-sized muffin pan with baking-cup liners.
2. Combine butter, chocolate, and cocoa in medium heatproof bowl. Set bowl over saucepan containing barely simmering water; heat mixture until butter and chocolate are melted and whisk until smooth and combined. Set aside to cool until just warm to the touch.
3. Whisk flour, baking soda, and baking powder in small bowl to combine.
4. Whisk eggs in second medium bowl to combine; add sugar, vanilla, and salt and whisk until fully incorporated. Add cooled chocolate mixture and whisk until combined. Sift about one-third of flour mixture over chocolate mixture and whisk until combined; whisk in sour cream until combined, then sift remaining flour mixture over and whisk until batter is homogenous and thick.
5. Divide batter evenly among muffin pan cups. Bake until skewer inserted into center of cupcakes comes out clean, 18 to 20 minutes.
6. Cool cupcakes in muffin pan on wire rack until cool enough to handle, about 15 minutes. Carefully lift each cupcake from muffin pan and set on wire rack. Cool to room temperature before icing, about 30 minutes.
7. Frost with chocolate cream frosting, recipe below.


Chocolate Cream Frosting
Ingredients:
12 ounces semisweet chocolate
1 2/3 cups heavy cream
1/4 cup light corn syrup

Directions:
1. Break up chocolate and pulverize in food processor until it is the texture of coarse sand.
2. Bring heavy cream to a boil, and with machine running, pour hot cream over the chocolate. Add corn syrup; process until just combined.
3. Turn mixture into a bowl and refrigerate until spreadable, stirring with a wooden spoon every 15 minutes; about 1 hour.

Friday, June 5, 2009

A Catered Baby Shower


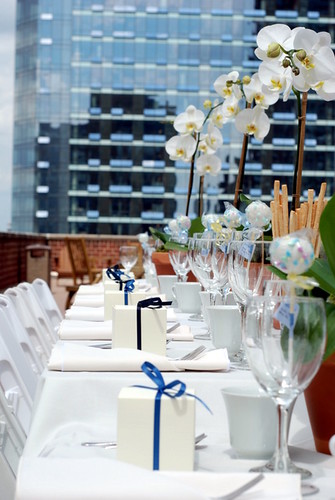
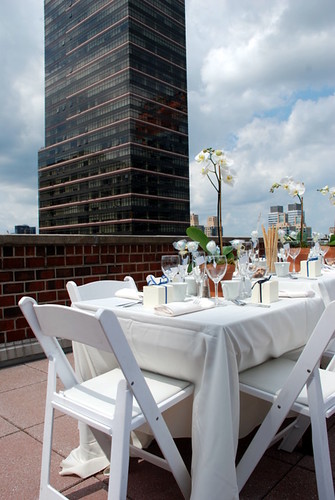
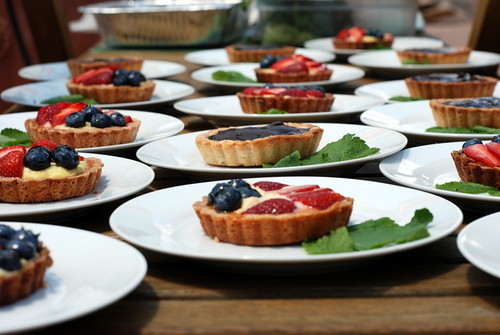
Here are a few shots from the baby shower I catered last weekend. That's right, I don't just bake these days, I do catering too! After the success of Jenn's bridal shower, I kept thinking about how much I enjoyed every aspect of throwing it - working with others in planning and the coordination of food and logistics. What I loved most was that in helping, the guest of honor was left worry-free from the painstaking details needed to make the event successful.

My involvement in the shower kept coming up in conversation from time to time, so when my co-worker told me the news that he and his wife were expecting their first this summer, he had the grand idea of having me cater his shower. I wasn't sure what I was getting myself into, but I jumped at the chance to flex my planning skills.

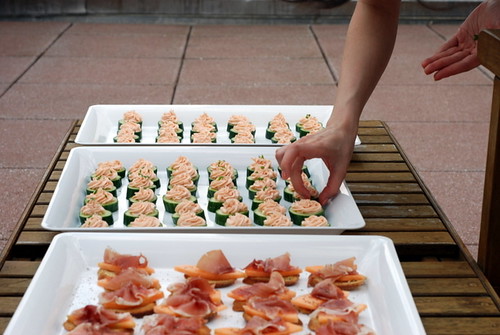
They wanted an outdoors seated lunch which took some time confirming a venue, but in the end it worked out nicely on the rooftop of a Columbus Circle apartment. What did I come up with in terms of food, you ask? This.


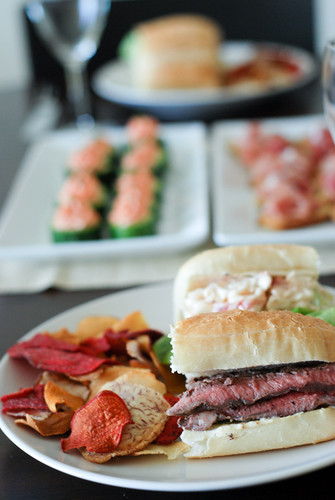
My test run included half a steak roll and half a lobster roll, but the final menu only had full lobster rolls. Below is my menu, and I will have detailed posts on the baked goods in the near future.

Hors D'oeuvres
Smoked Salmon Mousse in Cucumber Cups
Prosciutto Cantaloupe Crostini

Salad
Field Greens and Basil with Balsamic Vinaigrette and Parmesan Crisp

Main Course
Lobster Rolls with Root Chips

Dessert
Fruit Tart/Nutella Tart

Favor
Chocolate Cupcake with Chocolate Ganache

Wednesday, July 16, 2008

Thai Tea Cupcakes


Over a year ago, I attempted to make a cupcake with a creamy Thai tea filling. The filling turned out to be a disaster so I was left with a regular cupcake with some Thai tea frosting. I said I would try making them again, but I hadn't until now. It's not the same cupcake; instead of a creamy tea filling, I decided to flavor the cake itself with Thai tea. I used CurrySimple's Thai tea syrup just like last time, and I based the recipe off Cook's Illustrated recipe for yellow cupcakes. I wanted a moist cupcake to make up for omitting the creamy filling.

The main reason I wanted to get the Thai tea cupcake right is because I'm Thai. (How my best friend of 10 years thought I was Taiwanese is beyond me) Now, that may be a silly reason, but really, I like to use food to blend together the different cultures I belong to. I grew up eating a variety of both Thai and American desserts, so now I'm trying to come up with combinations that work. Hopefully, Thai tea cupcakes are just the beginning.

Thai Tea Cupcakes
adapted from Cook's Illustrated

Thai Tea Cream Cheese Frosting
from previous post

Ingredients:
1 1/2 cups flour
1 cup granulated sugar
1 1/2 teaspoons baking powder
1/2 teaspoon table salt
8 tablespoons unsalted butter, room temperature
1/2 cup sour cream
1 large egg, room temperature
2 large egg yolks, room temperature
1/4 cup Thai tea syrup

Directions:
1. Adjust oven rack to middle position; heat oven to 350 degrees F. Line mini muffin pan with paper.
2. Whisk together flour, sugar, baking powder, and salt in bowl of standing mixer fitted with paddle attachment.
3. Add butter, sour cream, egg and egg yolks, and vanilla; beat at medium speed until smooth and satiny, about 30 seconds. Scrape down sides of bowl with rubber spatula and mix by hand until smooth and no flour pockets remain.
3. Spoon batter evenly among cups. Bake until cupcake tops are pale gold and toothpick or skewer inserted into center comes out clean, 20 to 24 minutes.
4. Use skewer or paring knife to lift cupcakes from tin and transfer to wire rack; cool cupcakes to room temperature, about 45 minutes.
5. Pipe Thai tea frosting onto cupcakes and keep refrigerated until ready to serve.

Friday, July 4, 2008

Happy Independence Day!


Here's a cupcake to celebrate our nation's independence! I'm heading down to DC now (I'm late, I should have left an hour ago) for my brother's wedding, and coincidentally, they're having a red and blue theme. Oh my patriotic brother.

Well I hope everyone has a safe and happy weekend! Enjoy all the bbq's, fireworks, and whatever else you celebrate with!

Wednesday, May 21, 2008

Filled Matcha Cupcakes


I thought calling May Matcha Month would instantly make it easy for me to bake at least twice a week. I was hoping to pump out recipes one after another until you all were sick of matcha. Alas, that was not the case, and last week was a flop. Sorry for the quiet week, but I'm getting back into the matcha groove now.

I originally wanted to make a mini wedding cake to demonstrate what I wanted for my own (in reality it didn't turn out quite how I'd imagined). But it was probably 10PM when I started baking last night, and I just didn't have it in me to do all that baking and decorating. My decorating skills need lots of practice and knowing how I function late at night (not well), it would not have been a pretty sight.

So here we revisit the matcha cupcakes I made last year with a tiny twist. I recently tried two signature cupcakes from Purple Dots Cupcakes, and I absolutely love them! I've had both red velvet and chocolate with peanut butter frosting, and the thing I love most about them is the frosting in the middle. Jenny of Purple Dots says that's her thing: Frosting in Every Bite! Well, I was inspired and I wanted to put some frosting inside my own cupcakes. I tried two methods: the cone method and via mechanical pastry bag. For reasons unknown, I could not get the mechanical pastry bag to function as supposed to, so the cone method won simply because it worked. I realize I don't have pictures of the cupcakes' insides, but I'll try to work on that.

Filled Matcha Cupcakes
modified from original post

Ingredients:
1/2 cup unsalted butter, room temperature
1 cup sugar
1 large egg
1 large egg yolk
1 1/2 cups all-purpose flour
1 teaspoons baking powder
pinch of salt
1/2 cup milk
1 tablespoon matcha

Directions:
1. Beat butter on high until soft, about 30 seconds.
2. Add sugar. Beat on medium-high until light and fluffy, about 3 minutes.
3. Add eggs/egg yolk, beat for 30 seconds.
4. Sift together flour, baking powder, matcha, and salt in a bowl. Add to batter and mix to combine.
5. Add milk to the batter and mix until combine.
6. Scoop into cupcake cups and bake for 25 minutes at 350F degrees until a toothpick comes out clean.
7. Fill mechanical pastry bag with matcha frosting (recipe below) and using the filling tip, gently pipe frosting into cupcake from top. Frost cupcake using frosting spatula or your method of choice.
-OR-
7. Using a small pairing knife, cut off the top of the cupcake in the shape of a cone. Flip the top over and cut off the cone.
8. Fill the cavity with a teaspoon of frosting.
9. Replace the top of the cone. Frost cupcake using frosting spatula or your method of choice.

Matcha Buttercream Frosting
Ingredients:
1/2 cup butter, room temperature
4 tablespoons milk
1 tablespoon matcha powder
3 cups powdered sugar

Directions:
1. Sift together the confectioner's sugar and matcha powder.
1. Beat butter briefly, scrape bowl.
2. Add the sifted sugar and matcha mixture. Beat until smooth.
4. Add milk and continue to add for desired consistency.

Wednesday, March 26, 2008

Chocolate Peanut Butter Cupcakes


Two weeks in, Tim and I are already learning the lessons that come in marriage. We often hear that compromise is important, but what does that mean? Well, for us this week it meant buying chunky peanut butter. I'm a creamy peanut butter gal while Tim roots for chunky. We'd rather only have one jar in the cupboard, so I'm trying out chunky peanut butter to see if I can convert. I haven't eaten a chunky pb&j sandwich yet, but I at least started baking with it. And liked it. I liked the texture change of the cake, and it went well with the dark chocolate ganache. Here's to compromise.

Chocolate Peanut Butter Cupcakes
ganache from cupcake blog
cake adapted from epicurious

Ganache Ingredients:
8 ounces 70% cocoa chocolate, chopped
1 cup heavy cream
1 teaspoon vanilla
pinch salt

Cake Ingredients:
2 1/2 cups all purpose flour
1 teaspoon baking powder
1 teaspoon baking soda
1/2 teaspoon salt
10 tablespoons unsalted butter, room temperature
1/2 cup chunky peanut butter
1 2/3 cups brown sugar
4 large eggs
1 teaspoon vanilla extract
1 cup buttermilk

Ganache Directions:
1. Bring heavy cream to a simmer
2. Pour over chopped chocolate, stir to combine
3. Add vanilla and salt

Cake Directions:
1. Preheat oven to 350°F.
2. Line cupcake tray with cupcake liners.
3. Sift first 4 ingredients into medium bowl.
4. Using electric mixer, beat butter and peanut butter until blended.
5. Beat in sugar. Then beat in eggs, 1 at a time, then vanilla.
6. At low speed, beat in flour mixture alternately with buttermilk.
7. Spoon batter into cupcake liners.
8. Bake about 15 minutes. Cool cakes completely. Spread ganache over cupcakes.

Thursday, November 29, 2007

Happy Birthday Tim!


I made these cupcakes for Tim's birthday. He is probably the biggest fan of dark chocolate I know. People are usually surprised when they find out he loves chocolate more than I do. One of his favorite desserts is rich chocolate cake, so I wanted to make just that. Also, I had a bar of Valrhona 70% cocoa in the cupboard I'd been thinking about this week, and it seemed like the perfect occasion to use it.

Now, I've made an orange variation of this recipe before, but I did not pay attention to a key detail, ruining the texture of this lovely cupcake. Dark chocolate cakes are best made a day ahead, kept in the refrigerator until about an hour before serving. Do not make the mistake of leaving them out too long. They will not be dense and moist like it should be!

Melt-in-your-mouth Chocolate Cake
from Chocolate & Zucchini

Ingredients:
2 sticks minus 1 Tbsp butter
7 oz Valrhona 70% cocoa
1 cup sugar
4 eggs
a rounded tablespoon of flour

Directions:
Note: like all dark chocolate cakes, this cake is best made a day ahead (or at least in the morning if you serve it for dinner).

1. Preheat oven to 350 degrees F. Line a 12-cup muffin pan with cupcake cups.
1. Melt together the butter with the chocolate. Transfer into a medium mixing-bowl. 2. Add in the sugar, stir, and let cool a little.
3. Add in the eggs one by one, mixing well after each addition.
4. Add in the flour and mix well.
5. Scoop into cupcake cups and bake at 350 F for 30 minutes.
6. Turn the oven off but leave the cake inside for another ten minutes, then put the pan on a cooling rack on the counter to cool completely.
7. Cover with plastic wrap, refrigerate, and take it out about an hour before serving.

Tuesday, April 24, 2007

Magnolia Cupcakes


Besides being my favorite tree (I love those huge eggshell-like flowers), Magnolia's also a bakery known for its cupcakes in West Village that many of you are familiar with. I had to make some cupcakes for a tropical themed baby shower, and I decided to use recipes from the Magnolia Bakery Cookbook to try to replicate the famous cupcake. My thoughts? I knew how sweet the frosting would turn out, so I decreased the amount of sugar. All in all, not bad. The kids at the baby shower seemed to enjoy them, but I think children at that age will gladly take their sugar in any form.

Magnolia Vanilla Cupcakes

Ingredients:
1 1/2 cups self-rising flour
1 1/4 cups all-purpose flour
1 cup unsalted butter
2 cups sugar
4 large eggs
1 cup milk
1 teaspoon vanilla extract

Directions:
1. Preheat oven to 350 degrees F.
2. Line two 12-cup muffin tins with cupcake papers.
3. In a small bowl, combine the flours. Set aside.
4. In a large bowl, on the medium speed of an electric mixer, cream the butter until smooth. Add the sugar gradually and beat until fluffy, about 3 minutes. Add the eggs, one at a time, beating well after each addition. Add the dry ingredients in three parts, alternating with the milk and vanilla. With each addition, beat until the ingredients are incorporated but do not overbeat. Using a rubber spatula, scrape down the batter in the bowl to make sure the ingredients are well blended. Carefully spoon the batter into the cupcake liners, filling them about three-quarters full. Bake for 20–25 minutes, or until a cake tester inserted in the center of the cupcake comes out clean.
5. Cool the cupcakes in the tins for 15 minutes. Remove from the tins and cool completely on a wire rack before icing.

Magnolia Chocolate Cupcakes

Ingredients:
2 cups all-purpose flour
1 teaspoon baking soda
1 cup unsalted butter
1 cup granulated sugar
1 cup firmly packed light brown sugar
4 large eggs
6 ounces unsweetened chocolate, melted
1 cup buttermilk
1 teaspoon vanilla extract

Directions:
1. Preheat oven to 350 degrees F.
2. Line two 12-cup muffin tins with cupcake papers. Set aside.
3. In a small bowl, sift together the flour and baking soda. Set aside.
4. In a large bowl, on the medium speed of an electric mixer, cream the butter until smooth. Add the sugars and beat until fluffy, about 3 minutes. Add the eggs, one at a time, beating well after each addition. Add the chocolate, mixing until well incorporated. Add the dry ingredients in three parts, alternating with the buttermilk and vanilla. With each addition, beat until the ingredients are incorporated, but do not overbeat. Using a rubber spatula, scrape down the batter in the bowl to make sure the ingredients are well blended and the batter is smooth. Carefully spoon the batter into the cupcake liners, filling them about three-quarters full. Bake for 20–25 minutes, or until a cake tester inserted in the center of the cupcake comes out clean.
5. Cool the cupcakes in the tins for 15 minutes. Remove from the tins and cool completely on a wire rack before icing.

Magnolia Vanilla Buttercream Frosting

Ingredients:
1 cup unsalted butter
4 to 6 cups confectioners' sugar
1/2 cup milk
2 teaspoons vanilla extract

Directions:
1. Place the butter in a large mixing bowl. Add 4 cups of the sugar and then the milk and vanilla. On the medium speed of an electric mixer, beat until smooth and creamy, about 3-5 minutes.
2. Gradually add the remaining sugar, 1 cup at a time, beating well after each addition (about 2 minutes), until the icing is thick enough to be of good spreading consistency. You may not need to add all of the sugar. If desired, add a few drops of food coloring and mix thoroughly. (Use and store the icing at room temperature because icing will set if chilled.) Icing can be stored in an airtight container for up to 3 days.

Tuesday, March 6, 2007

Orange Chocolate Cupcakes


Hmm, another cupcake recipe. Based on another recipe from cupcakeblog. I promise, the purpose of this blog isn't merely to copy chockylit. But I do have to start somewhere, and as my previous posts have already established that I'm a big fan of hers, who better to emulate? Here's my twist on her rich chocolate cupcake.

Orange Chocolate Cupcakes frosted with Nutella
adapted from cupcakeblog

Ingredients:
200 gram bar of Chocolat Frey Bouquet d´Orange (55% cacao)
1 1/2 cups butter
2 1/4 cups sugar
8 eggs
1 1/4 cup flour
1/4 cup cocoa powder, unsweetened
1 1/2 teaspoons baking powder
3 teaspoons orange zest
pinch of salt
Nutella

Directions:
1. Chop chocolate and transfer into the bowl of a standing mixer.
2. Add butter to the chocolate and place the bowl over a pan of simmering water. Stir until chocolate melts and butter is combined.
3. Remove from heat and stir in sugar. Let mixture cool for 10 minutes.
4. Beat in an electric mixer for 3 minutes.
5. Add one egg at a time, mixing for 30 seconds between each
6. Sift the flour, cocoa powder, baking powder, orange zest, and a pinch of salt into the mixture and mix until blended.
7. Scoop into 24 cupcake cups and bake at 350 F for 25 minutes or until a toothpick comes out clean.
8. After cupcakes are cooled, frost with Nutella.

Thursday, January 25, 2007

Matcha Cupcakes


Here's another recipe from chockylit's cupcakeblog. This was the first cupcake recipe of hers that I've been dying to try out. I even had a friend from California purchase and send me the exact brand of matcha used from his local Whole Foods because unfortunately, they don't carry the brand on the east coast. I was very pleased with the whole cupcake, especially the frosting. I think it tastes like green tea ice cream. Yum.


Matcha Cupcakes
slightly adapted from cupcakeblog

Ingredients:
1 cup unsalted butter, room temperature
2 cups sugar
2 large eggs
2 large egg yolks
3 cups all-purpose flour
2 teaspoons baking powder
1/8 teaspoon salt
1 cup milk
2 tablespoons matcha

Directions:
1. Beat butter on high until soft, about 30 seconds.
2. Add sugar. Beat on medium-high until light and fluffy, about 3 minutes.
3. Add eggs/egg yolks one at a time, beat for 30 seconds between each.
4. Whisk together flour, baking powder, and salt in a bowl. Add to batter and mix to combine.
5. Mix matcha in with the milk. Add to the batter and mix until combine.
6. Scoop into cupcake cups and bake for 12-15 minutes at 350 degrees until a toothpick comes out clean. Makes about 60 mini cupcakes.

Matcha Buttercream Frosting
Ingredients:
1/2 cup butter, room temperature
4 tablespoons milk
1 tablespoon matcha powder
3 cups powdered sugar, sifted

Directions:
1. Mix matcha in with the light cream to make a paste.
2. Beat butter briefly, scrape bowl.
3. Add the sifted powdered sugar and matcha paste. Beat until smooth.
4. Continue to add milk for desired consistency.

Monday, January 8, 2007

Faux-Thai Tea Cupcakes


I'm a big fan of chockylit's cupcakeblog, and this was my first attempt at making her Thai Tea cupcakes. Unfortunately, they didn't turn out my first time. I messed up the very essence of the cupcake, the thai tea filling, so I went ahead and omitted the filling. Which is why I called them faux-thai tea cupcakes. Lesson learned: take your time! I started baking late at night, and while I was testing the cupcakes to see if they were ready to come out, I let the creamy filling burn on the stove.

There will be a next attempt, I promise.

Thai Tea Cupcakes
from cupcakeblog

Cupcakes
Ingredients:
1/2 cup unsalted butter, room temperature
1-1/2 cups sugar
2 cups all-purpose flour
1/2 teaspoon baking powder
1/2 teaspoon baking soda
1/8 teaspoon salt
1 cup evaporated milk
1 teaspoon vanilla
4 large egg whites

Directions:
1. Beat butter on high until soft, about 30 seconds.
2. Add sugar. Beat on medium-high until light and fluffy, about 3 minutes.
3. Whisk together flour, baking powder, baking soda, and salt in a bowl.
4. Measure out vanilla and milk together.
5. Add about a third of the flour to the butter/sugar mixture and beat to combine.
6. Add about one half the milk mixture and beat until combined.
7. Repeat above, alternating flour and milk and ending with the flour mixture. Transfer to a bowl.
8. Clean mixer bowl well and dry thoroughly.
9. Whip egg whites until soft peaks form.
10. Mix in about a half cup of egg whites in to the batter, then fold the batter into the egg whites, gently until all egg whites streaks are gone.
11. Scoop into cupcake papers about two thirds full.
12. Bake for 20-25 minutes at 350 degrees until a toothpick comes out clean. Makes about 15 regular cupcakes.

Thai Tea Creamy Filling
Ingredients:
3/4 cup sugar
6 tablespoons all-purpose flour
1/8 teaspoon salt
1-3/4 cups milk
1/4 cup CurrySimple Thai Tea syrup
4 large egg yolks

Directions:
1. In a small bowl, whisk egg yolks and set aside.
2. In a medium bowl, mix sugar, flour, and salt together and set aside.
3. In a small saucepan, bring milk and Thai Tea syrup to simmer over medium-low heat.
4. Pour about a half cup of the milk over the dry mixture and mix to combine.
5. Transfer back into the pan and continue cooking over medium-low heat, stirring constantly, until mixture thickens. About 5 minutes.
6. Slowly add a small amount of the hot mixture to the eggs and mix to combine. Transfer back into the pan and continue cooking over medium-low heat, stirring constantly for 3 minutes.
7. Transfer to a bowl, let cool for 10 minutes. Then cover with plastic wrap and refrigerate until cool.

Thai Tea Cream Cheese Frosting
Ingredients:
1/4 cup unsalted butter, room temperature
1 8-ounce package Phili cream cheese
1/4 cup + 2 tablespoons CurrySimple Thai Tea syrup
4 cups powdered sugar, sifted

Directions:
1. Bring cheese and butter to room temperature by letting it sit out for 1 or 2 hours.
2. Sift powdered sugar into a bowl or onto parchment.
3. Beat butter and cheese at medium speed until creamy.
4. Add half of the sugar and 1/4 cup of Thai tea syrup. Beat until combined.
5. Gradually add remaining sugar (more if you have to) until you get to the consistency and sweetness you like. Add more syrup to get to the flavor you want. I added 2 more tablespoons.

Assemble:
1. Using a small pairing knife, cut off the top of the cupcake in the shape of a cone. Flip the top over and cut off the cone.
2. Fill the cavity with a teaspoon of cream filling.
3. Replace the top of the cone.
4. Frost then sprinkle with crushed Thai tea leaves.