Showing posts with label breakfast. Show all posts

Wednesday, March 30, 2011

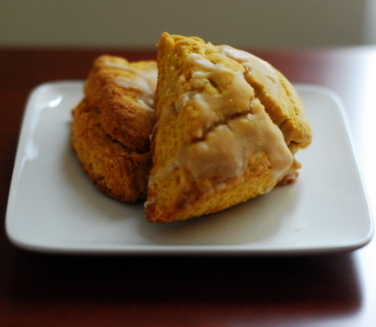
Maple Frosted Pumpkin Scones

These days I've been so busy NOT baking, I haven't had a lot of baking material to write about. I'm happy to say that's not the case today.

I covered the Bloggers' Cupping Event at The Coffee Foundry earlier this month, and I want to share with you all what I was happy to share with the bloggers at the event.


These maple frosted pumpkin scones. Well, until the day arrives we can send real food through the Internet, I'll just be sharing my recipe with y'all. I'm sorry I can't send over a warm scone to you right now, but if you have some time on your hands this weekend (and don't we all have tons?), I highly urge you to consider making these delicious scones. And if you do, let me know how they turn out!

Maple Frosted Pumpkin Scones
adapted from previous recipe

Ingredients:
3 cups all-purpose flour
1/3 cup sugar
2 1/2 teaspoons baking powder
3/4 teaspoon ground cinnamon
1/4 teaspoon ground ginger
1/4 teaspoon ground nutmeg
1/4 teaspoon ground allspice
3/4 teaspoon kosher salt
1/2 cup cold butter, cut into 1/2-inch pieces
1/2 cup buttermilk
1 cup canned pumpkin
Maple Frosting (recipe below)

Directions:
1. Preheat the oven to 425 degrees F.
2. In a large mixing bowl, combine the flour, sugar, baking powder, spices and salt.
3. With a pastry cutter, work the butter into the dry mixture until it is thoroughly incorporated and has the consistency of fine breadcrumbs.
4. Make a well in the center of the dry ingredients, and pour the buttermilk and canned pumpkin into the well. Combine the ingredients until all the dry mixture is wet. Be sure not to knead.
5. Turn the mixture onto a floured surface and gather the dough together. Gently pat the dough to make circles about 1" thick and around 4" in diameter.
6. Using a knife that's been run through cold water, cut the circle of dough into 6 wedges, and lay them on a baking sheet covered with Silpat or parchment paper.
7. Pop scones in freezer for 15 minutes prior to baking.
8. Bake scones for about 20 minutes, or until lightly browned.
9. Place baked scones on drying rack and drizzle with maple frosting.

Maple Frosting

Ingredients:
1 cup butter
1/2 cup brown sugar
1/2 cup granulated sugar
1/2 cup heavy cream
1/2 cup powdered sugar
1 teaspoon vanilla

Directions:
1. In a small saucepan melt the butter, brown sugar, granulated sugar and heavy cream.
2. Bring mixture to a low boil, then turn off heat.
3. After syrup has cooled down, whisk in powdered sugar and vanilla until reaching a smooth consistency.

Monday, January 10, 2011

Alice's Tea Cup Cookbook Giveaway Winner

As you may have guessed, this post's purpose is to say, we have a winner for the Alice's Tea Cup Cookbook Giveaway! I modified my random dish generator to tell me who the lucky reader is. (That's the little spreadsheet I wrote to give me dinner ideas when I'm fresh out)

And the cookbook goes to...


Congratulations Michelle! You'd make a wonderful breakfast companion, and I hope you enjoy your copy of Alice's Tea Cup Cookbook! Please email me your mailing address at talidabakes at gmail dot com, and we'll send your copy out.

Thanks to everyone who participated this giveaway. I realized I have many favorite breakfasts as I read through each comment; I guess I don't discriminate when it comes to this much-loved meal.

Sunday, January 2, 2011

Alice's Tea Cup Peppermint Stick Scones and Cookbook Giveaway!


Like many others living in the New York area, I love Alice’s Tea Cup. I love their selections of scones and tea, I love the flavorful potato-chicken hash, and the sense of whimsy I feel each time I visit. When I read through Alice’s Tea Cup Cookbook, I was even more charmed to learn that many recipes incorporate tea as key ingredients!

*


I shared these peppermint stick scones with my in-laws while visiting Indiana for Christmas. They were the perfect biscuit for the holiday, and I’ll take any excuse to have candy for breakfast. I’d also love to share a copy of this cookbook with one lucky reader! Just leave a comment on this post, telling me your favorite breakfast to share with others. You have until January 9, 2011 at 11:59PM, EST. A winner will be picked at random. One entry per person, and giveaway is limited to US residents only.

*These may look more like doughnut holes than your typical scone because we shaped and baked them in mini-muffin pans. Following the cookbook’s recipe below will give you a classic scone shape.


Peppermint Stick Scones
makes 10-12 scones

Ingredients:
3 cups all-purpose flour
1/3 cup sugar
1/2 teaspoon baking soda
2 1/2 teaspoons baking powder
3/4 teaspoon kosher salt
3/4 cup unsalted butter, cut into 1/2-inch pieces
1 cup crushed Brach's peppermint Star Brites (or similar candy)
1 1/4 cups buttermilk
1 teaspoon pure vanilla extract
1/4 cup heavy cream (for brushing)

Directions:
1. Preheat the oven to 425 degrees F.
2. In a large mixing bowl, combine the flour, sugar, baking soda, baking powder, and salt.
3. With clean hands, work the butter into the dry mixture until it is thoroughly incorporated and has the consistency of fine breadcrumbs. Add 3/4 cup of the crushed peppermint candy and combine well, so that it is evenly distributed throughout the dry mixture.
4. Make a well in the center of the dry ingredients, and pour the buttermilk and vanilla extract into the well. Combine the ingredients until all the dry mixture is wet, but do not knead!
5. Turn the mixture onto a floured surface and gather the dough together. Gently pat the dough to make a rectangle about 1 1/2 inches thick. Using a dough cutter, cut the scones into wedges measuring about 3 1/2 x 4 inches, and lay them on a nonstick baking sheet. Gather the remaining dough together lightly to cut out more scones - just don't knead the dough too much.
6. Brush the top of each scone liberally with heavy cream, and sprinkle them with the remaining 1/4 cup crushed peppermint candy.
7. Bake the scones for about 12 minutes, or until lightly browned.

FTC Disclaimer: I received free copies of Alice's Tea Cup Cookbook to review/giveaway from HarperCollins Publishers.

Wednesday, February 24, 2010

Paris Breakfasts


Next to family, breakfast is the most important thing. For all the walking Tim and I did, it was important to start our day right with a Parisian breakfast. While staying in the Montmartre area, we started our days with a cup of café crème* and either a pain au chocolat or a croissant. They were perfect; those flaky, buttery layers of pastry. I woke up every morning looking forward to the croissants.


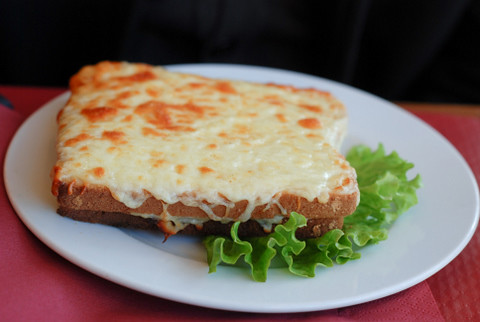
On our last morning in Paris, we only had time to get breakfast because we had to make our way to the airport to catch an early afternoon flight. There were several things still left on our list of things to eat, so that morning we decided to forgo the simple croissant breakfast in search for a croque monsieur. We couldn't go too far, so we walked around our hotel near the Porte Maillot station in the 17th arrondissement and knew we found our place when we saw a chalkboard sign advertising croque monsieur! The bistro was lovely, with chairs lined up to watch over Avenue de la Grande Armée; it made for a fine last meal in Paris.


We ordered a café crème each, and a croque monsieur for the monsieur and a croque madame for the madame. Tim ate all of his and half of mine, but that happens at most meals for us. They were fantastic sandwiches, and when eaten with some mustard, mmm, even better. I was satisfied, Tim was stuffed, and we were both happy.

Our last meal was at Tabac Le Maillot, and the name makes sense after I mention that there was a large tobacco stand in the bistro. Does it? I'm not sure. I'm just the girl who asked "Ou est la toilette?" properly but could not understand the response spoken back in rapid French. It turned out I had to pay 20 cents to use la toilette.


Tabac Le Maillot
78 Avenue de la Grande Armée
Paris, France 75017
01 45 74 41 42


*I'm italicizing words I like to pronounce the French way now. Please oblige me by doing the same.

Sunday, September 27, 2009

Breakfast Vol au Vent


Since I joined the Daring Bakers, this is the second time I've seen pastry dough incorporated into the challenge. Last year, the Danish Braid was my first tackle with pastry dough. Yes, it was a daunting task, but after making the Danish Braid, I felt like I could easily do it again. Well, I've done it again, but it wasn't exactly by choice. This month's Daring Bakers' Challenge was the French Vols Au Vent, made with our choice of filling. I chose to make a breakfast Vol au Vent, filled with an Italian sausage and egg scramble. I do love pastry dough, but because it's so time-consuming to make, it looks like I'll stick with only making it for Daring Bakers' Challenges.
The September 2009 Daring Bakers' challenge was hosted by Steph of A Whisk and a Spoon. She chose the French treat, Vols-au-Vent based on the Puff Pastry recipe by Michel Richard from the cookbook Baking With Julia by Dorie Greenspan.

Breakfast Vols Au Vent

Ingredients:
Chilled pastry dough (recipe below)
egg wash (1 egg or yolk beaten with a small amount of water)
Scrambled eggs cooked with Italian sausage

Directions:
1. Line a baking sheet with parchment and set aside.
2. Using a knife or metal bench scraper, divided your chilled puff pastry dough into three equal pieces. Work with one piece of the dough, and leave the rest wrapped and chilled.
3. On a lightly floured surface, roll the piece of dough into a rectangle about 1/8 to 1/4-inch thick. Transfer it to the baking sheet and refrigerate for about 10 minutes before proceeding with the cutting.
4. Using a ¾-inch cutter for small vols-au-vent, or a 2- to 2.5-inch round cutter for large, cut centers from half of the rounds to make rings. These rings will become the sides of the vols-au-vent, while the solid disks will be the bottoms. You can either save the center cut-outs to bake off as little “caps” for you vols-au-vent, or put them in the scrap pile.
5. Dock the solid bottom rounds with a fork (prick them lightly, making sure not to go all the way through the pastry) and lightly brush them with egg wash. Place the rings directly on top of the bottom rounds and very lightly press them to adhere. Brush the top rings lightly with egg wash, trying not to drip any down the sides (which may inhibit rise). If you are using the little “caps,” dock and egg wash them as well.
6. Refrigerate the assembled vols-au-vent on the lined baking sheet while you pre-heat the oven to 400ºF (200ºC). (You could also cover and refrigerate them for a few hours at this point.)
7. Once the oven is heated, remove the sheet from the refrigerator and place a silicon baking mat or another sheet of parchment over top of the shells. This will help them rise evenly. Bake the shells until they have risen and begin to brown, about 10-15 minutes depending on their size. Reduce the oven temperature to 350ºF (180ºC), and remove the silicon mat or parchment sheet from the top of the vols-au-vent. If the centers have risen up inside the vols-au-vent, you can gently press them down. Remove the sheet on top and continue baking until the layers are golden, about 15-20 minutes more.
8. Remove to a rack to cool. Cool to room temperature for cold fillings or to warm for hot fillings.
9. Fill with eggs and sausage and serve.
Note: Although they are at their best filled and eaten soon after baking, baked vols-au-vent shells can be stored airtight for a day. Shaped, unbaked vols-au-vent can be wrapped and frozen for up to a month (bake from frozen, egg-washing them first).


Michel Richard’s Puff Pastry Dough
from Baking with Julia by Dorie Greenspan
yields 2-1/2 pounds dough

Ingredients:
2 1/2 cups unbleached all-purpose flour
1 1/4 cups (5.0 oz/ 142 g) cake flour
1 tablespoon salt
1 1/4 cups ice water
1 pound very cold unsalted butter
extra flour for dusting work surface

Directions:
Mixing the Dough
1. Check the capacity of your food processor before you start. If it cannot hold the full quantity of ingredients, make the dough into two batches and combine them.
2. Put the all-purpose flour, cake flour, and salt in the work bowl of a food processor fitted with a metal blade and pulse a couple of times just to mix. Add the water all at once, pulsing until the dough forms a ball on the blade. The dough will be very moist and pliable and will hold together when squeezed between your fingers.
3. Remove the dough from the machine, form it into a ball, with a small sharp knife, slash the top in a tic-tac-toe pattern. Wrap the dough in a damp towel and refrigerate for about 5 minutes. Meanwhile, place the butter between 2 sheets of plastic wrap and beat it with a rolling pin until it flattens into a square that's about 1" thick. Take care that the butter remains cool and firm: if it has softened or become oily, chill it before continuing.

Incorporating the Butter
1. Unwrap the dough and place it on a work surface dusted with all-purpose flour with your rolling pin, press on the dough to flatten it and then roll it into a 10" square. Keep the top and bottom of the dough well floured to prevent sticking and lift the dough and move it around frequently. Starting from the center of the square, roll out over each corner to create a thick center pad with "ears," or flaps.
2. Place the cold butter in the middle of the dough and fold the ears over the butter, stretching them as needed so that they overlap slightly and encase the butter completely. (If you have to stretch the dough, stretch it from all over; don't just pull the ends) you should now have a package that is 8" square.
3. To make great puff pastry, it is important to keep the dough cold at all times. There are specified times for chilling the dough, but if your room is warm, or you work slowly, or you find that for no particular reason the butter starts to ooze out of the pastry, cover the dough with plastic wrap and refrigerate it . You can stop at any point in the process and continue at your convenience or when the dough is properly chilled.

Making the Turns
1. Gently but firmly press the rolling pin against the top and bottom edges of the square (this will help keep it square). Then, keeping the work surface and the top of the dough well floured to prevent sticking, roll the dough into a rectangle that is three times as long as the square you started with, about 24". With this first roll, it is particularly important that the butter be rolled evenly along the length and width of the rectangle; check when you start rolling that the butter is moving along well, and roll a bit harder or more evenly, if necessary, to get a smooth, even dough-butter sandwich.
2. With a pastry brush, brush off the excess flour from the top of the dough, and fold the rectangle up from the bottom and down from the top in thirds, like a business letter, brushing off the excess flour. You have completed one turn.
3. Rotate the dough so that the closed fold is to your left, like the spine of a book. Repeat the rolling and folding process, rolling the dough to a length of 24" and then folding it in thirds. This is the second turn.

Chilling the Dough
1. If the dough is still cool and no butter is oozing out, you can give the dough another two turns now. If the condition of the dough is iffy, wrap it in plastic wrap and refrigerate it for at least 30 minutes. Each time you refrigerate the dough, mark the number of turns you've completed by indenting the dough with your fingertips. It is best to refrigerate the dough for 30 to 60 minutes between each set of two turns.
2. The total number of turns needed is six. If you prefer, you can give the dough just four turns now, chill it overnight, and do the last two turns the next day. Puff pastry is extremely flexible in this regard. However, no matter how you arrange your schedule, you should plan to chill the dough for at least an hour before cutting or shaping it.
Monday, July 14, 2008

Croissants


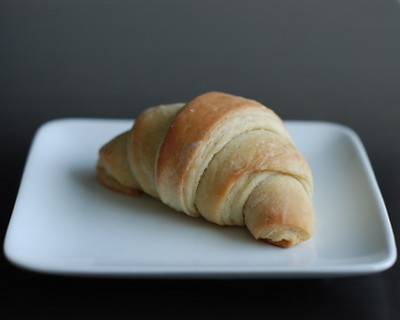
Happy Bastille Day! I made cupcakes for America's Independence Day, so I thought croissants would be more fitting for France's national holiday. I saved extra pastry dough from when I made the danish braid with the intention of making croissants. I love the buttery pastry, and though mine came out more doughy than flaky, it tasted just fine. I did underproof the croissants because I ran out of time, but I guess I was lucky not to have any leaky butter (a tell-tale sign of underproofing). Making the dough was definitely the harder part, but I still have a lot to learn about making pastries. A lot to learn from the French.


Ingredients:
Danish Dough

Directions:
1. Line baking sheet with parchment paper.
2. Place chilled dough on floured surface and gently roll dough into a square.
3. Cut dough into 2 rectangles, then cut each rectangle into thirds. Cut each rectangle on diagonal to make triangles. Lift one triangle off work surface, holding base (triangle’s short side) in one hand and tip in other and gently stretch. With base closest to you, cut 1-inch slit into center of base. (The small slit will allow croissant to roll evenly.) Fold two sides of slit outward and with both hands, roll triangle, gently stretching dough as you roll, leaving last 1/4 inch of tip unrolled.
4. Gently transfer croissant to prepared baking sheet (unrolled tip facing downward). Bring ends of croissant toward each other to form crescent shape. Repeat with remaining triangles.
5. Cover croissants loosely with plastic wrap. Let rise at room temperature until puffy (they will not double in size), 45 to 60 minutes.
6. Preheat oven to 400 degrees F. Bake until croissants are golden brown, 18 to 22 minutes. Cool croissants on wire rack until warm, about 15 minutes. Serve warm.

Sunday, June 29, 2008

Danish Braid


Well look who's gone and joined the Daring Bakers! The Daring Bakers is a group of food bloggers who all bake the same challenging recipe on a monthly basis, all started by Lis and Ivonne. I'm always up for new recipe challenges, so I don't know what's taken me so long to join the group.

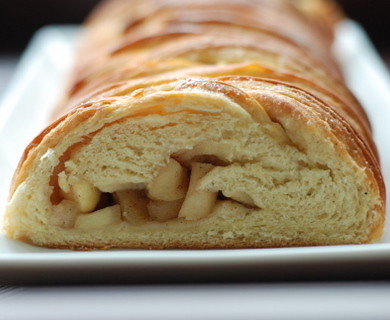
This month's challenge was to make a Danish Braid. I couldn't have been happier as I love the flaky pastry and making pastry dough was on my never ending list of things to bake. It was a challenge all right, but I followed the instructions to a tee and it came out just fine. It's a doozy of a recipe, so read through it and take a guess how long it took me to complete.

Danish Braid
makes 2 large braids
from Sherry Yard’s The Secrets of Baking

Ingredients:
1 recipe Danish Dough (see below)
2 cups apple filling (see below)

1. Line a baking sheet with parchment paper. On a lightly floured surface, roll the dough into a 15 x 20-inch rectangle, ¼ inch thick. If the dough seems elastic and shrinks back when rolled, let it rest for a few minutes, then roll again. Place the dough on the baking sheet.
2. Along one long side of the pastry make parallel, 5-inch-long cuts with a knife or rolling pastry wheel, each about 1 inch apart. Repeat on the opposite side, making sure to line up the cuts with those you’ve already made.
3. Spoon the filling you’ve chosen to fill your braid down the center of the rectangle. Starting with the top and bottom “flaps”, fold the top flap down over the filling to cover. Next, fold the bottom “flap” up to cover filling. This helps keep the braid neat and helps to hold in the filling. Now begin folding the cut side strips of dough over the filling, alternating first left, then right, left, right, until finished. Trim any excess dough and tuck in the ends.

Proofing and Baking
1. Spray cooking spray onto a piece of plastic wrap, and place over the braid.
2. Proof at room temperature or, if possible, in a controlled 90F degree environment for about 2 hours, or until doubled in volume and light to the touch.
3. Near the end of proofing, preheat oven to 400F degrees. Position a rack in the center of the oven.
4. Bake for 10 minutes, then rotate the pan so that the side of the braid previously in the back of the oven is now in the front. Lower the oven temperature to 350F degrees, and bake about 15-20 minutes more, or until golden brown. Cool and serve the braid either still warm from the oven or at room temperature.

Danish Dough
makes 2 1/2 pounds dough

Ingredients:
1 ounce fresh yeast or 1 tablespoon active dry yeast
1/2 cup whole milk
1/3 cup sugar
Zest of 1 orange, finely grated
3/4 teaspoon ground cardamom
1-1/2 teaspoons vanilla extract
1/2 vanilla bean, split and scraped
2 large eggs, chilled
1/4 cup fresh orange juice
3-1/4 cups all-purpose flour
1 teaspoon salt

1 cup cold unsalted butter
1/4 cup all-purpose flour

Dough (detrempe)
1. Combine yeast and milk in the bowl of a mixer fitted with the paddle attachment and mix on low speed. Slowly add sugar, orange zest, cardamom, vanilla extract, vanilla seeds, eggs, and orange juice. Mix well.
2. Change to the dough hook and add the salt with the flour, 1 cup at a time, increasing speed to medium as the flour is incorporated. Knead the dough for about 5 minutes, or until smooth. You may need to add a little more flour if it is sticky.
3. Transfer dough to a lightly floured baking sheet and cover with plastic wrap. Refrigerate for 30 minutes.

Butter Block
1. Combine butter and 1/4 cup flour in the bowl of a mixer fitted with a paddle attachment and beat on medium speed for 1 minute. Scrape down the sides of the bowl and the paddle and then beat for 1 minute more, or until smooth and lump free. Set aside at room temperature.
2. After the detrempe has chilled 30 minutes, turn it out onto a lightly floured surface. Roll the dough into a rectangle approximately 18 x 13 inches and ¼ inch thick. The dough may be sticky, so keep dusting it lightly with flour.
3. Spread the butter evenly over the center and right thirds of the dough. Fold the left edge of the detrempe to the right, covering half of the butter. Fold the right third of the rectangle over the center third. The first turn has now been completed. Mark the dough by poking it with your finger to keep track of your turns, or use a sticky and keep a tally. Place the dough on a baking sheet, wrap it in plastic wrap, and refrigerate for 30 minutes.
4. Place the dough lengthwise on a floured work surface. The open ends should be to your right and left. Roll the dough into another approximately 13 x 18 inch, ¼-inch-thick rectangle. Again, fold the left third of the rectangle over the center third and the right third over the center third. No additional butter will be added as it is already in the dough. The second turn has now been completed. Refrigerate the dough for 30 minutes.
5. Roll out, turn, and refrigerate the dough two more times, for a total of four single turns. Make sure you are keeping track of your turns. Refrigerate the dough after the final turn for at least 5 hours or overnight. The Danish dough is now ready to be used. If you will not be using the dough within 24 hours, freeze it. To do this, roll the dough out to about 1 inch in thickness, wrap tightly in plastic wrap, and freeze. Defrost the dough slowly in the refrigerator for easiest handling. Danish dough will keep in the freezer for up to 1 month.

Apple Filling
makes enough for 2 braids

Ingredients:
4 Fuji apples, peeled, cored, and cut into ¼-inch pieces
1/2 cup sugar
1 tsp. ground cinnamon
1/2 vanilla bean, split and scraped
1/4 cup fresh lemon juice
4 tablespoons unsalted butter

1. Toss all ingredients except butter in a large bowl.
2. Melt the butter in a sauté pan over medium heat until slightly nutty in color, about 6 - 8 minutes.
3. Add the apple mixture and sauté until apples are softened and caramelized, 10 to 15 minutes.

Friday, June 20, 2008

Cinnamon Apple Muffins


I almost didn't make these muffins. Last night I came home a little later than expected, but it was all worth it because I got to have some much needed girl time. I went with my sister-in-law and friends to a champagne tasting and filled up on all sorts of bubbly and caviar. I knocked out when I got home and woke up two hours later with a headache. But I'm visiting my old roommate in DC this weekend and wanted to bring breakfast for our early morning crabbing trip tomorrow, so I had to bake. Fortunately I got through the recipe just fine - I almost lost track of how much flour I put in, but somehow figured it out. Baking takes concentration and precision, things a little bubbly can take away from you. Well the muffins are made (and they're not bad), and I'm looking forward to even more fun this weekend.

Cinnamon Apple Muffins
adapted from Cook's Illustrated

Ingredients:
1 1/2 cups flour
1/2 tablespoon baking powder
1/4 teaspoon baking soda
1/4 teaspoon salt
5 tablespoons unsalted butter, softened
1/2 cup granulated sugar
1 large egg
3/4 cup sour cream
1 cup apple filling, recipe below

Directions:
1. Adjust oven rack to lower middle position and heat oven to 375F degrees. Mix flour, baking powder, baking soda, and salt in medium bowl; set aside.
2. Beat butter and sugar with electric mixer on medium-high speed until light and fluffy, about 2 minutes. Add egg, beating well after addition. Beat in one-half of dry ingredients. Beat in one-third of sour cream. Beat in remaining dry ingredients in two batches, alternating with sour cream.
3. Fold apple filling into the batter, mix until incorporated
4. Spray mini muffin tin with vegetable cooking spray or coat lightly with butter. Scoop batter evenly among cups. Bake until muffins are golden brown, 12 to 15 minutes.
5. Set on wire rack to cool slightly, about 5 minutes. Remove muffins from tin and serve warm.

Apple Filling
from Sherry Yard's The Secret of Baking

Ingredients:
2 Fuji apples, peeled, cored, and cut into ¼-inch pieces
1/4 cup sugar
1/2 tsp. ground cinnamon
1/2 vanilla bean, split and scraped
1/8 cup fresh lemon juice
2 tablespoons unsalted butter

Directions:
1. Toss all ingredients except butter in a large bowl.
2. Melt the butter in a saute pan over medium heat until slightly nutty in color, about 6 - 8 minutes.
3. Add the apple mixture and saute until apples are softened and caramelized, 10 to 15 minutes. Cool to room temperature.

Tuesday, June 17, 2008

Raspberry Baked French Toast


From the lack of posts here, you can probably tell it's summer. Last summer I went on an unintended summer hiatus, and while I do not intend to repeat this year, there will be some weeks where I go quiet.. like the couple past ones.

I made this french toast for my church's monthly women's prayer breakfast, and just like previous months, I leave feeling blessed to have such great community. One thing I shared with the women there, and I'll share here, is that I desire to be more intentional and purposeful in all aspects of my life. I guess that's been on my mind for a while since I mentioned it the last time I made breakfast. To sum up my thoughts, I'd like to be able to explain who I am and why with more than just a "I was brought up that way." It's been challenging thinking through some of the bigger things, namely my faith and my career. Perhaps I'll share a little more throughout the summer if I sense interest.

For now, I'll explain why I bake what I bake. There's always a story behind each dish, and I love sharing it. I decided to make this raspberry french toast after my other breakfast recipe took much much longer than expected. I had fresh raspberries, I had leftover challah, it just made sense. Hey, I never said my stories were going to be interesting.

Raspberry Baked French Toast
adapted from previous post

Ingredients:
1/2 loaf challah, cut into 1 inch slices
3 eggs
3/4 cup half-and-half cream
3/4 teaspoon vanilla extract
1/8 teaspoon lemon zest
1/4 cup butter
1/4 cup brown sugar
1 Tbspn corn syrup
1/4 teaspoon salt
1/2 cup fresh raspberries
powdered sugar, for garnish

Directions:
1. In a small heavy saucepan melt butter with brown sugar and corn syrup over moderate heat, stirring, until smooth
2. Pour into a 9x9 baking dish. Arrange bread slices in baking dish, squeezing them slightly to fit.
3. Whisk together eggs, half and half, vanilla, and salt until combined well and pour evenly over bread. Chill bread mixture, covered, at least 8 hours and up to 1 day.
4. Preheat oven to 350F degrees and bring bread mixture to room temperature.
5. Arrange raspberries throughout bread mixture by placing between layers of bread and sprinkling on top.
6. Bake uncovered, in middle of oven until puffed and edges are pale golden, 35 to 40 minutes.
7. Garnish with powdered sugar and serve.

Saturday, May 31, 2008

Matcha Pancakes


The matcha pancakes were a last minute idea. I'd heard of matcha waffles, matcha donuts, so I thought, why not pancakes? Of course, it wasn't until after I made them did I google and find several examples online. I used an old pancake recipe I had and added in a little bit of matcha. I intended to eat these like regular pancakes with butter and maple syrup so I wasn't too experimental with the recipe. It made for a decent slight change in pancakes, but there's definitely room for more creativity.

This month passed by so fast. I had great plans for Matcha Month, but there were a few more recipes I didn't get around to completing. I'm sure you all have experienced something similar, when life just gets so busy. So busy we forget to breathe, to enjoy life. I was reminded today that being more mindful and intentional with how I spend my time actually settles those feelings of being too busy. These pancakes were made and enjoyed with all that in mind, and it made for a great Saturday morning to kick off the day. I hope this will be a good reminder to myself to keep that in practice.

Matcha Pancakes

Ingredients:
1 cup flour
1 1/2 tablespoons matcha
2 teaspoons granulated sugar
1/2 teaspoon salt
1/2 teaspoon baking powder
1/4 teaspoon baking soda
3/4 cup buttermilk
1/4 cup milk
1 large egg
2 tablespoons butter, melted
additional butter, for griddle and serving

Directions:
1. Mix dry ingredients in medium bowl. Pour milks into separate bowl, whisk in egg and melted butter.
2. Dump wet ingredients into dry ingredients all at once; whisk until just mixed.
3. Heat griddle or pan over strong medium-high heat. Coat with butter, and when a drop of water dances on the pan, pour batter onto griddle, about 1/4 cup at a time.
4. When pancake bottoms are brown and top surface starts to bubble (2-3 minutes) flip cakes and cook until remaining side has browned (1-2 minutes). Re-butter the pan and repeat for next batch of pancakes.

Sunday, May 11, 2008

Happy Mother's Day!


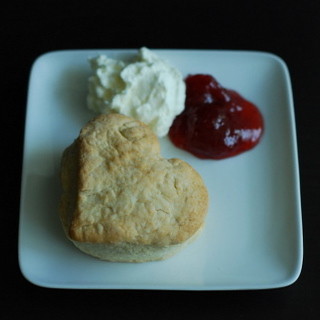
This year is a special Mother's Day because I now have two mothers to celebrate! Some could find that bothersome, but I am so lucky to have a great mom and a great mother-in-law. They both are great examples of godly women, and I want to follow in their examples. Mama (Tim's mom) has treated me like her own her daughter from the start, and has encouraged me with words of wisdom and by always letting me know she's keeping me in prayer. Mom (my mom) has the kindest heart and I definitely get my desire to be hospitable from her. Since we could not celebrate with them in person, I decided to send them scones and jam to enjoy this morning - Tim and I would do the same, so we would all be celebrating together in spirit. (I didn't send the crème fraîche because it wouldn't have kept so fresh.) Happy Mother's Day to my two beautiful moms, and to the rest of the mothers out there!

Sweet Milk Scones
from Cook's Illustrated March 1994

Ingredients:
2 cups unbleached all-purpose flour
1 teaspoon cream of tartar
1/2 teaspoon baking soda
1/2 teaspoon table salt
1-2 tablespoons granulated sugar
4 tablespoons butter, chilled and cut into 1/2-inch pieces
3/4 cup whole milk

Directions:
1. Adjust oven rack to middle position and heat oven to 450F degrees.
2. Sift first 5 ingredients into large bowl. With 2 knives cut butter into flour mixture until mixture resembles coarse meal with a few slightly larger butter lumps.
3. Make a well in the center of mixture and pour in milk. Working quickly, blend ingredients together with a rubber spatula into a soft, slightly wet dough. Turn dough onto a well-floured work surface.
4. Quickly roll dough to 1/2 inch thick. Use a lightly greased and floured 3-inch biscuit cutter to stamp dough with one decisive punch, cutting close together to generate as few scraps as possible. Dip cutter into flour as often as necessary to keep dough from sticking. Push scraps of dough together so that edges join; firmly pinch edges with fingertips to make a partial seal. Pat this remaining dough to 1/2 inch thick; continue to cut 3-inch rounds.
5. Place dough rounds 1 1/2 inches apart on a greased baking sheet. Bake until scones are lightly brown, 10 to 12 minutes. Serve immediately.

Crème Fraîche
adapted from Cook's Illustrated Sept 2003

Ingredients:
1/4 cup sour cream
1/4 cup heavy cream
pinch of salt
1 teaspoons sugar

Directions:
1. Whisk sour cream and heavy cream in bowl; set aside at room temperature until thickened to the consistency of yogurt, about 1 1/2 hours.
2. Just before serving, stir in salt and sugar.

Friday, April 25, 2008

Baked French Toast


TGIF! I'm definitely looking forward to the weekend because I am so tired right now. When I left my building this morning, the doorman and I exchanged greetings, but he added in a "You look like you don't wanna go." So true, so true. One of the best parts about the weekends are Saturday mornings. I mentioned my association of my dad singing to Saturday mornings in the wedding post, but I loved them generally because it was family time. Mom always cooked some sort of hot breakfast, and we'd all enjoy the beginning of the weekend in our own way, be it reading the news (or the comics), playing guitar, or just eating. But the important part was that we were together. I mention to Tim that I'd love for our family to have those Saturday mornings together, and I'm so glad he agrees because...

What have we always said is the most important thing? (Answer as George Michael would)

Baked French Toast
adapted from Food Network

Ingredients:
1/2 loaf bread, cut into 1 inch slices
3 eggs
3/4 cup half-and-half cream
3/4 teaspoon vanilla extract
1/8 teaspoon ground cinnamon
1/4 cup butter
1/4 cup brown sugar
1 Tbspn corn syrup
1/4 teaspoon salt
powdered sugar and strawberries, for garnish

Directions:
1. In a small heavy saucepan melt butter with butter with brown sugar and corn syrup over moderate heat, stirring, until smooth
2. Pour into a 9x13 baking dish. Arrange bread slices in one layer in baking dish, squeezing them slightly to fit.
3. Whisk together eggs, half and half, vanilla, and salt until combined well and pour evenly over bread. Chill bread mixture, covered, at least 8 hours and up to 1 day.
4. Preheat oven to 350F degrees and bring bread mixture to room temperature.
5. Bake uncovered, in middle of oven until puffed and edges are pale golden, 35 to 40 minutes.
6. Garnish with powdered sugar and strawberries as wanted.

Tuesday, April 22, 2008

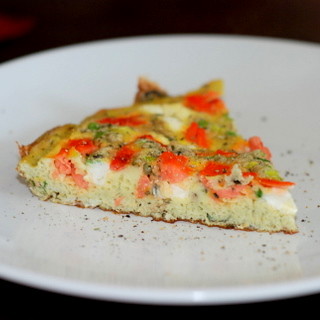
Smoked Salmon Frittata


A family friend was in town last weekend, so Tim and I invited her over for brunch. Our parents go back to their college days, and since a lot of our extended relatives aren't in the United States, our families eventually became, well, family. Road trips were taken together, our moms took turns taking care of the kids during the summers, and we have many memories of the games we used to play. Jane and I did all the typical little girl things, but we did so primarily with paper. [See previous note about growing up in a printing shop] As we looked through my wedding photos over brunch, she kept fussing over the pictures and commenting about how we're "all grown up" now. Well, I suppose she's right. My paper wedding dress turned into a silk taffeta dress, and my Fisher-Price cooking set paved the way for this blog.

Smoked Salmon Frittata

Ingredients:
6 large eggs
1/3 cup whole milk
1 Tbspn chopped basil
3 Tbspn chopped chives
1/2 teaspoon ground pepper
couple pinches of salt
2 oz cold cream cheese, cut into small pieces
3 oz smoked salmon, thinly sliced and chopped
1 tablespoon butter

Directions:
1. Preheat your oven to 450F degrees.
2. Whisk the eggs with milk. Slowly whisk in basil, chives, pepper, and salt. Set aside.
3. Melt butter in a 9 inch oven proof skillet over medium-high heat. Pour egg mixture into the skillet and cook for 1-2 minutes.
4. Scatter cream cheese pieces on top and cook until eggs are just set and there isn't a lot of liquid running around the pan. Run a spatula underneath the sides of the frittata and tilt the pan so the uncooked eggs run to the underside and cook. Let cook another 1-2 minutes.
5. Set smoked salmon in place by sprinkling on top top, then turn down the heat a bit and cook for another 3 minutes.
6. Place the skillet in the oven and bake for about 5 minutes, or until well set, puffy, and golden on top. Remove from oven, cool slightly, then cut into wedges and serve.

Monday, June 11, 2007

Espresso-Walnut Coffee Cake


I love coffee, and I love cakes. Well, then it should make perfect sense that I love coffee cakes too! And I do, it's definitely one of my favorite ways to start out the day. Usually, coffee cake doesn't actually have coffee in it. It's often served with coffee, which is my guess why it's called the name it is. But you can imagine my excitement when my friend Betty introduced me to this recipe back in 2002. We first made it together, and I was so thrilled with the outcome, I continued to make it again and again. To those who give me credit for this coffee cake, I'm sorry, but you've all been mistaken. First, thank Cooking Light. Then, thank Betty for finding the recipe and introducing it to me.

Espresso-Walnut Coffee Cake
adapted from Cooking Light, August 2001 issue

Ingredients:
Cooking spray
2 teaspoons all-purpose flour
1/4 cup packed brown sugar
3 tablespoons finely chopped walnuts
1 teaspoon ground cinnamon
1 teaspoon instant espresso and 2 teaspoons instant coffee granules, divided
5 tablespoons butter, softened
1 cup granulated sugar
2 eggs
2/3 cup vanilla yogurt
1 teaspoon vanilla extract
1/2 teaspoon baking soda
1/4 teaspoon salt
1 1/3 cups all-purpose flour

Directions:
1. Preheat oven to 350 degrees F.
2. Coat a 12-cup muffin pan with cooking spray, dust with 2 teaspoons flour, and line each cup with 4" long strips of parchment paper.
3. Combine brown sugar, walnuts, cinnamon, and 1 teaspoon espresso granules in a small bowl.
4. Cream together butter and granulated sugar. Stir in yogurt, vanilla, baking soda, and salt.
5. Add flour and 2 teaspoons espresso powder, stirring just until blended.
6. Spoon half of the batter into the muffin cups, and sprinkle with half of the brown sugar mixture. Carefully spoon remaining batter over brown sugar mixture, and sprinkle with remaining brown sugar mixture.
7. Bake at 350 degrees F for 25 minutes or until a wooden pick inserted in center comes out clean. Cool for 10 minutes in pan on a wire rack.

Tuesday, May 8, 2007

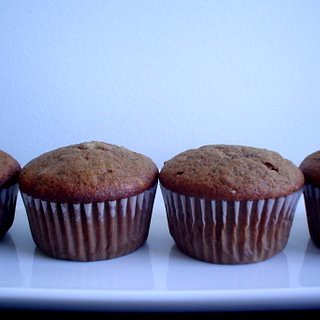
Chocolate Banana Muffins


Here's another over-ripened banana recipe. One thing about me, I don't like making plain ol' banana bread anymore. I had an awful experience where I burned one, and now I know doubling the temperature does NOT mean it will bake in half the time. I won't make that mistake again, but still, banana bread reminds me of that traumatic moment. Plus, I love new recipes (and chocolate!), so I decided to use the recipe below.

Chocolate Banana Muffins
adapted from allrecipes

Ingredients:
1 cup butter, softened
2 cups white sugar
4 eggs
6 bananas, mashed
2 teaspoons vanilla extract
3 cups all-purpose flour
2 teaspoons baking soda
1/4 cup unsweetened cocoa powder
1 cup sour cream
1 cup semisweet chocolate chips

Directions:
1. Preheat oven to 350 degrees F (175 degrees C). Line three 12-cup muffin trays with muffin paper linings.
2. In a large bowl, cream together butter, sugar, and eggs. Stir in bananas and vanilla.
3. Sift in flour, baking soda and cocoa; mix well. Blend in sour cream and chocolate chips. Pour batter into prepared muffin trays.
4. Bake in preheated oven for 20-25 minutes, or until a toothpick inserted into center of a loaf comes out clean.

Tuesday, April 17, 2007

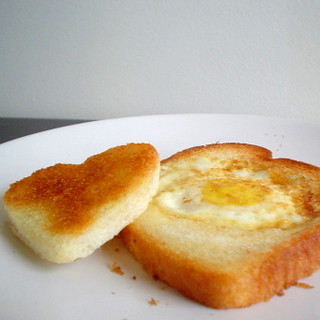
Eggs in a Nest


I know this isn't a baking post, but I couldn't resist posting this. Not only is breakfast the most important meal of the day, but it's also the meal I look forward to the most. I love eggs. I love buttered toast. Thus is makes perfect sense that I would love eggs IN my buttered toast! And yes, that's a heart-shaped piece of toast (as well as a heart-shaped egg in the bigger piece)... to show my love for the meal.

Eggs in a Nest

Ingredients:
1 slice of bread
1 egg
1 tablespoon butter

Directions:
1. Using a cookie cutter, cut out a piece of the bread. Butter and toast inside piece.
2. In a small pan, melt the butter, then place bread in pan. Fry for a little on one side, flip to fry the other side. Crack egg inside the middle of the bread. Cook until egg reaches desired firmness. For over-easy, flip toast and egg.

Monday, April 16, 2007

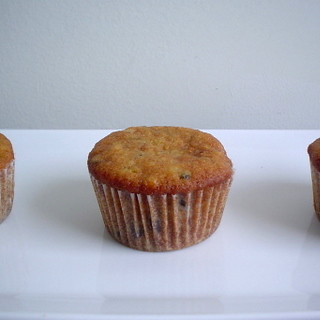
Mocha Banana Muffins


Leftover ripened bananas makes for great breakfast recipes. I love a good banana nut bread like most of you do, but I was definitely in the mood for making something with chocolate. Then I had some espresso while I was making the muffins and thought I'd add that into the mix. So here we have... mocha banana muffins.

Mocha Banana Muffins

Ingredients:
2/3 cup butter
3/4 cup sugar
1 egg
2 ripe bananas
2 teaspoons espresso
3/4 teaspoon vanilla extract
1-1/2 cups all-purpose flour
1/8 teaspoon salt
3/4 teaspoon baking powder
3/4 teaspoon baking soda
2/3 cup semisweet chocolate chips

Directions:
1. Cream together sugar and butter. Beat in egg, banana, espresso, and vanilla.
2. Add in flour, salt, baking powder, and baking soda. Blend until flour disappears.
3. Gently mix in chocolate chips.
4. Spoon batter in 12 paper-lined muffin cups.
5. Bake for 25 minutes in preheated (350F degrees) oven.