Friday, August 5, 2011

New Look and Site!


Dear friends and family of Talida Bakes, please note that this site has moved! It took me a tad bit longer than I anticipated, but I've finally said goodbye to Blogger, and I've embraced WordPress with an awesome custom theme made by my childhood friend and owner of Do Good Media Jane.

I'm excited to be back to blogging as I've got tons of recipes and events to share with y'all. Please update your RSS subscription and go visit my new site!

Friday, April 15, 2011

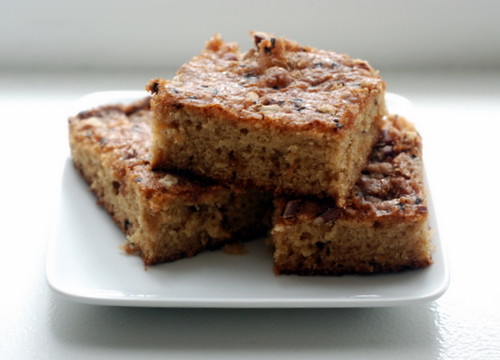
Made-with-Coffee Coffee Cake


If you knew me back in college, this cake may look familiar to you. It was one of my most requested baked goods, and it was on the short list of things I baked at the time. Until last month, I had always made this cake with instant coffee - it's what the original recipe called for, and it gave the cake its coffee flavor without hassle.


Now, this coffee cake is different from all the ones I've made in the past. This one is made with Bolivia Fair Trade Organic coffee from the Coffee Foundry. When helping Norm and Wilson for the Bloggers' Coffee Cupping Event last month, I knew this was the perfect cake to offer at the event since it incorporate both loves of coffee and cake.


The main thing I modified to make this cake with real coffee was replacing the regular yogurt with Greek yogurt. I mixed the brewed coffee into the Greek yogurt, creating a coffee yogurt to bake with. Pecans and chocolate chips are optional in this recipe, but they add nice texture to this moist coffee cake.

Thanks again to all the bloggers that came out to the event last month, and for those who asked for the recipe, here you go!

Made-with-Coffee Coffee Cake
adapted from previous recipe

Ingredients:
2 teaspoons all-purpose flour
1/4 cup packed brown sugar
1 teaspoon ground cinnamon
2 teaspoons instant coffee (optional - I added this for extra coffee flavor)
5 tablespoons butter, softened
1 cup granulated sugar
2 eggs
1 cup Greek yogurt
1 teaspoon vanilla extract
2/3 cup strongly brewed Bolivian coffee
1/2 teaspoon baking soda
1/4 teaspoon salt
1 1/3 cups all-purpose flour
1/3 cup chocolate chips (optional)
3 tablespoons chopped pecans (optional)

Directions:
1. Preheat oven to 350 degrees F.
2. Grease a 8"x8" pan, dust with 2 teaspoons flour.
3. Combine brown sugar, cinnamon, and optional instant coffee in a small bowl. Set aside.
4. Fold in strongly brewed coffee into Greek yogurt until well mixed.
5. In a stand mixer, cream together butter and granulated sugar.
6. Mix in eggs, one at a time. Then add in coffee yogurt and vanilla.
7. Add flour, baking soda, salt, mixing just until flour disappears. Fold in optional pecans and chocolate chips if desired.
8. Pour half of the batter into prepared pan, and sprinkle with half of the brown sugar mixture. Carefully spoon remaining batter over brown sugar mixture, and sprinkle with remaining brown sugar mixture.
8. Bake at 350 degrees F for 25 minutes or until a wooden pick inserted in center comes out clean. Cool for 10 minutes in pan on a wire rack.

Wednesday, April 6, 2011

Kurogoma (Black Sesame) Shortbread Cookies

Guess what, y'all? Last Saturday, NYC raised $4644 for Peace Winds America/Japan in our Bake Sale for Japan! And the Bake Sales across the nation have raised over $120,000! I wasn't as involved as I wish I could have been, but I hope my shortbread cookies helped raise a tiny sum towards this awesome amount. Another BIG thank you goes out to Lillian from Sweets by Sillianah and Celia from Cookbook Archaeology for coordinating a wonderfully run bake sale.

Check out their posts for pictures and details of the sale at Brooklyn Flea.

For the bake sale, I chose to make matcha, azuki, and kurogoma shortbread cookies because they are all prominent Japanese flavors that I love working with. Matcha, azuki, and kurogoma are simply the Japanese terms for green tea, red bean, and black sesame. I've made all varieties of the cookies before, but the kurogoma shortbread cookie happens to be one of those recipes I never got around to posting. Until now, that is.


The ingredients I used to flavor the shortbread cookies: black sesame paste, sweetened red bean paste, and green tea powder (tried out a new green tea product - not bad!).


And here are the wrapped shortbread cookies!

Kurogoma (Black Sesame) Shortbread Cookies
adapted from previous recipe

Ingredients:
1 3/4 cup flour
1 cup butter
2/3 cup powdered sugar
1/4 cup cornstarch
1/8 teaspoon salt
1/2 cup black sesame paste

Directions:
1. In a stand mixer, beat the butter and sugar together on medium speed for about 3 minutes, until the mixture is smooth.
2. Add flour, cornstarch, and salt to butter mixture, until flour mixture is incorporated into the dough. Be sure not to overwork the dough.
3. Fold in black sesame paste.
4. Transfer the dough to a gallon-size plastic bag. Put the bag on a flat surface, leaving the top open, and using a rolling pin to flatten the dough into a rectangle about 1/4 inch thick. Roll carefully, making sure not to leave creases in the dough. Seal the bag after rolling into proper size and press out as much air as possible. Place in freezer for about 30 minutes, up to 2 days.
5. Position the racks to divide the oven into thirds and preheat the oven to 325 degrees F. Line two baking sheets with parchment or Silpat.
6. Put the plastic bag on a cutting board and slit it open. Turn the firm dough out onto the board (discard the bag) and, using a ruler as a guide and a sharp knife, cut the dough into 2 inch squares. Transfer the squares to the baking sheets and carefully prick each one four times with a fork, gently pushing the tines through the cookies until they hit the sheet.
7. Bake for 18 to 20 minutes, rotating the sheets from top to bottom and front to back at the midway point. Transfer the cookies to a rack to cool. Yields 20 cookies.

Friday, April 1, 2011

NYC Bake Sale for Japan

As I know many of you have been doing recently, I've been praying for Japan. Not only for protection and physical recovery, but for emotional and spiritual restoration as well. And I pray for what I don't understand because frankly, there sure is a lot of that.


One other thing I'm doing is baking for Japan. If you've followed my blog for a while, you'll know that's what I do. I bake, and I bake for others. When I don't know what to say or what to do when people are hurting, I want to meet their basic need of eating. Okay, so maybe eating comfort foods like cookies and cake isn't quite a basic need, but when eaten in moderation, I know it helps.

I'll be busy baking a few of my favorite cookies tonight (can you guess what they are?), and tomorrow we'll be selling a LOT of baked goods at the Brooklyn Flea in Fort Greene, come rain or shine. All proceeds will go to the charity Peace Winds Japan.

If you're in the NYC area tomorrow, please visit the Bake Sale for Japan at the Brooklyn Flea, and look for our setup in front of the fence outside on the sidewalk. Special thanks to Lillian of Sweets by Sillianah for organizing the NYC sale and to the many volunteers involved around the nation who are graciously donating their time and efforts for a great cause.

NYC Bake Sale for Japan at Brooklyn Flea
April 2, 10AM-5PM
176 Lafayette Avenue
Brooklyn, NY 11238

Wednesday, March 30, 2011

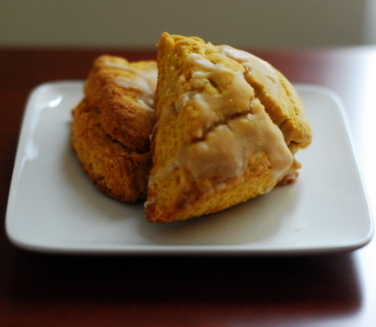
Maple Frosted Pumpkin Scones

These days I've been so busy NOT baking, I haven't had a lot of baking material to write about. I'm happy to say that's not the case today.

I covered the Bloggers' Cupping Event at The Coffee Foundry earlier this month, and I want to share with you all what I was happy to share with the bloggers at the event.


These maple frosted pumpkin scones. Well, until the day arrives we can send real food through the Internet, I'll just be sharing my recipe with y'all. I'm sorry I can't send over a warm scone to you right now, but if you have some time on your hands this weekend (and don't we all have tons?), I highly urge you to consider making these delicious scones. And if you do, let me know how they turn out!

Maple Frosted Pumpkin Scones
adapted from previous recipe

Ingredients:
3 cups all-purpose flour
1/3 cup sugar
2 1/2 teaspoons baking powder
3/4 teaspoon ground cinnamon
1/4 teaspoon ground ginger
1/4 teaspoon ground nutmeg
1/4 teaspoon ground allspice
3/4 teaspoon kosher salt
1/2 cup cold butter, cut into 1/2-inch pieces
1/2 cup buttermilk
1 cup canned pumpkin
Maple Frosting (recipe below)

Directions:
1. Preheat the oven to 425 degrees F.
2. In a large mixing bowl, combine the flour, sugar, baking powder, spices and salt.
3. With a pastry cutter, work the butter into the dry mixture until it is thoroughly incorporated and has the consistency of fine breadcrumbs.
4. Make a well in the center of the dry ingredients, and pour the buttermilk and canned pumpkin into the well. Combine the ingredients until all the dry mixture is wet. Be sure not to knead.
5. Turn the mixture onto a floured surface and gather the dough together. Gently pat the dough to make circles about 1" thick and around 4" in diameter.
6. Using a knife that's been run through cold water, cut the circle of dough into 6 wedges, and lay them on a baking sheet covered with Silpat or parchment paper.
7. Pop scones in freezer for 15 minutes prior to baking.
8. Bake scones for about 20 minutes, or until lightly browned.
9. Place baked scones on drying rack and drizzle with maple frosting.

Maple Frosting

Ingredients:
1 cup butter
1/2 cup brown sugar
1/2 cup granulated sugar
1/2 cup heavy cream
1/2 cup powdered sugar
1 teaspoon vanilla

Directions:
1. In a small saucepan melt the butter, brown sugar, granulated sugar and heavy cream.
2. Bring mixture to a low boil, then turn off heat.
3. After syrup has cooled down, whisk in powdered sugar and vanilla until reaching a smooth consistency.

Friday, March 25, 2011

Khun Ya's Massaman Curry

Did you think I forgot? What on earth is she talking about? I'm a little embarrassed to admit, but there have been a number of times I said I would post something on this blog, but it never happens. Forgetfulness, ADD, whatever may be the cause, I want to make things right and follow up with all the promises I once made on this blog.


First thing I'm following up on has to do with my grandmothers. I wrote about the big birthday bash celebrating my maternal grandmother Arpor, and now I'd like to introduce you all to my paternal grandmother, Khun Ya. I relate to Khun Ya in a lot of ways. She loves to cook, she loves talking about cooking, and she is known for overwhelming house guests with tons of food. Several years ago, hip surgery made it hard for her to cook at home, so the family arranged for live-in help to take care of the cooking. This took some getting used to, but Khun Ya took it in stride when she realized she was the boss of the kitchen.

When we visited Khun Ya at her house last July, I asked what was her favorite dish to cook. If you read the title of this post, you'll know what her answer was. And while she didn't give me thorough instructions on how to make it, she did give me the ingredient list. I came up with the rest based on what I've learned from my mom. It may not be too different from other recipes out there, but knowing that it came from my family makes it special to me.


Khun Ya's Massaman
Curry


Ingredients:
1 lb. beef cubes
1 lb. potatoes, cubed
1 large onion, chopped
2 cups string beans or other vegetables
1 small can massaman curry paste (Khun Ya said not to bother making my own, the store-bought kind is good enough)
1 can coconut milk
1 tablespoon tamarind paste
palm sugar, to taste
fish sauce, to taste

Directions:
1. In a large pot, cook coconut milk and massaman curry paste over low heat, and stir until well-mixed.
2. Add beef and stir enough to coat meat with curry mix. Add water to cover meat in pot.
3. Mix in tamarind paste.
4. Keep curry on low heat for roughly an hour, or until beef becomes tender. Refill water as needed during this time.
5. After beef is tender, add potatoes and onions. Add sugar and fish sauce to taste at this point. If needed, add more tamarind paste too.
6. Keep on heat for another 20 minutes or so.
7. Before serving, check taste and add more fish sauce if needed.


Bonus fact about Khun Ya: Just like my maternal grandma, she also had 11 children! Here's most of us (not everyone since some have passed and some couldn't make it) at our past family reunion.

Sunday, March 13, 2011

Bloggers' Cupping Event at The Coffee Foundry


I know I already mentioned it the other week, but I'll say it again. I'm proud to be friends with coffee geeks Norm and Wilson, and I want others to know what they're doing at The Coffee Foundry is very cool.


A couple Saturdays ago, Esther of Ambitious Deliciousness and I held a Bloggers' Cupping Event at The Coffee Foundry to do just that. We invited a few bloggers to come out and experience what coffee cupping is all about. What happened exactly? Norm led us through a sensory journey as we sniffed and sipped their coffee in different stages it went through from bean to drink.


I had the pleasure of supplying breakfast for the event, which included pumpkin cardamom scones, pecan coffee cake, Greek yogurt parfaits, and fruit salad. Visit back because I'll be posting the scone and coffee cake recipes!


During the cupping, we tasted a Brazilian Cerrado and an Ethiopia Sidamo and were asked to describe the aroma, acidity, body, flavor and finish in terms like carbony/nippy/fat/rough. Luckily we were supplied with a whole glossary of terms to choose from (because I wouldn't normally describe the taste of coffee as nippy or fat), and those terms were just among dozens of others.


We learned about all that goes into the science of brewing coffee well. New to me was the fact that ground coffee blooms when hot water is poured over just as it should if the grounds are fresh. Also, speaking to freshness of coffee, Norm taught us about the Rule of 15. The Rule of 15 refers to three rules about coffee:

1) Green coffee should be roasted within 15 months of harvest, or it goes stale.
2) Roasted coffee should be ground within 15 days of roasting, or it goes stale.
3) Ground coffee should be brewed within 15 minutes of grinding, or it goes stale.


Coffee geeks might already know that rule, but it was new to me. I think I can speak for most of the attendees that we all learned a significant amount about coffee last Saturday. It's easy to overlook the complexity it can take to arrive at your daily cup of coffee, so participating in a coffee cupping was a refreshing way to understand the precision (and balance of art and science) in making a good cuppa joe.


The Coffee Foundry is having special promotion for blog readers! Get $1 off any beverage when you mention "Foundry Coffee Cupping" upon ordering. This promotion is good until April 15, 2011. And if you're interested in participating in future cupping events, either comment below or send me a quick email.

And a big thanks goes to Albert Cheung Photography for supplying the photography for this post!

Wednesday, March 2, 2011

Happy Texas Independence Day! Round Up Texas BBQ

While Texas Independence Day is the celebration of the adoption of the Texas Declaration of Independence on March 2, 1836, I tend to treat it like Texas Pride Day. Sure, it's been ten years since I've lived in Texas, but I hold the state near and dear to my heart.


Quite literally, since I wear this awesome pendant on a regular basis.

I didn't get to bake anything to celebrate the day, so instead I want to highlight a recent experience that gave me the warm fuzzies.

The story starts last fall with a scenic train ride up the beautiful Hudson Valley. (No pictures, sorry!) It's Saturday morning, and I find myself on Main Street in Beacon, NY. As soon as I see the store window to home and crafts store Clay Wood & Cotton, I know I'm in for it. I go in and gush over the store, and only after I pick up every handmade piece in the store do I start to chat with store owners Kristy and Kristen. I find out Kristy and I share Houston as a hometown, and she recommends visiting a Texas BBQ joint down in Cold Spring. I can't that day, but I say I'll check it out in the future.

The future didn't come until two weekends ago. I'm back upstate, and Round Up Texas BBQ is the last stop of the day's (secret) mission. We swing open the door, and Linda, Bill, and Round Up's Texan decor greet us. My Texan accent senses the surroundings and feels safe enough to come out. I mention the recommendation from Clay Wood & Cotton, and Linda shares her BBQ adventures. She's proud of her story, and we're eager to taste her hard work. We sample everything they had that day, and I leave as a happy camper.


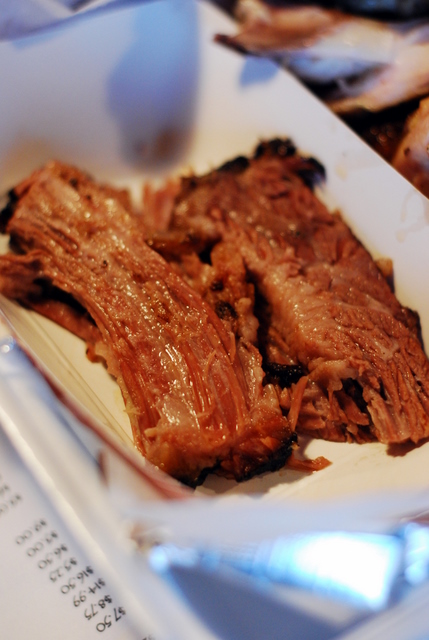
Brisket should always be that moist.
Photos taken by Albert Cheung.


They have their sausage made by a local culinary institute, but it tastes like it could be Texas-made.


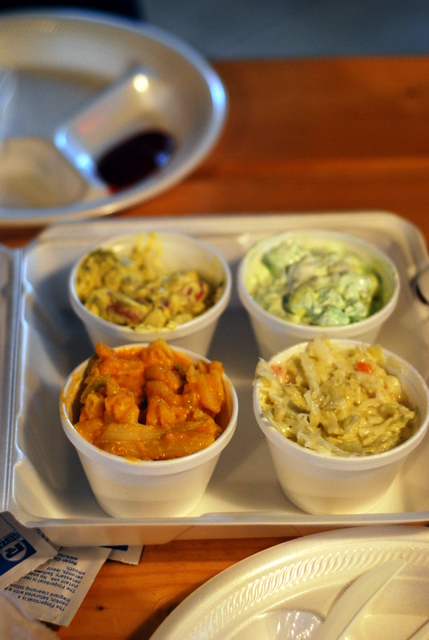
Clockwise from the top left: Potato Salad, Green Stuff, Cole Slaw, Mac & Cheese (Linda's own recipe with 4 cheeses, 4 pastas, and jalapeños)


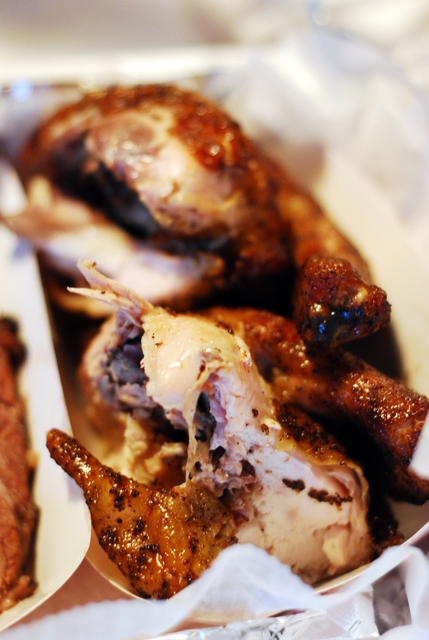
Their BBQ chicken doesn't steal the show, but it's still tasty and juicy.

On this day, why don't you raise a cold Lone Star or Shiner Bock with me, and let's give it up for Texas!

Round Up Texas BBQ and Tumbleweed Saloon
2471 Route 9
Cold Spring, NY 10516

Also check out Metromix Hudson Valley for a detailed slide show feature on Round Up Texas BBQ.

Friday, February 11, 2011

Coffee Foundry

Here's a blurb I use when describing my interests: I love coffee, cake, and coffee cake. Cake and coffee just go so well together, right? Well, meet my friends Norm and Wilson. They've been roasting single-origin coffee locally for the past several years, but within the last year, they opened shop at The Coffee Foundry in the West Village. This video by local menswear label 3sixteen highlights cool things being done in their jeans (and they did a whole series featuring other creative professionals).

Singularities: The Coffee Foundry from 3sixteen on Vimeo.

Now, I've definitely come a long way from my hatred of coffee at first taste. Me - hate coffee? Yes, I was 8 years old, and what I thought was a glass of iced Coke was in fact my mom's glass of olieng, or sweetened black coffee. But since then, I've had quite the coffee journey, and it looks a little like this:


My coffee journey can be summarized as disguising the coffee with sugar and cream to learning to appreciate the coffee itself and simply experience it. Last year I discovered a lot of West Coast roasters with the help of Citizen Bean, but I'm also lucky to have access to locally roasted beans by Norm and Wilson. The Coffee Foundry is a place where I can sit back and have their roasts brewed on the spot, and like 3sixteen, I think what they're doing is really cool.

The Coffee Foundry
186 West 4th Street
New York, NY 10014
coffeefoundry.com

If you're an NYC blogger interested in joining a cupping event at The Coffee Foundry please email me at talidabakes at gmail dot com.

Thursday, February 3, 2011

Azuki (Red Bean) Filled Mochi


新年快樂! Happy Chinese New Year! I wish you all a prosperous year, and may your celebrations be filled with lots of food and warmth!

It's been terribly frigid here, and in the city that never sleeps, I'm still expected to go into work as long as the subways are running. Luckily my commute only involves strapping on my boots and walking (though with this week's weather, ice skates would have been more fitting).

In these frosty conditions, nothing warms me up like food, friends, and family. Tonight we will feast on lots of Chinese food, and I'll be snacking on this azuki mochi throughout the day.

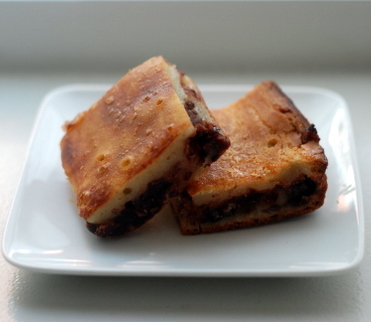
Tiny Urban Kitchen featured a post of Chinese New Year recipes, and the nian gao (年糕) post spoke to me. I love making (and eating) mochi, but I usually cook it using steam. So I thought I'd try out a baked mochi cake, stuffed with red bean paste. Thanks for the idea and the recipe, Jen!

If you haven't eaten anything like this before, think of it like a super-chewy-Asian-flavored-brownie. Or blondie. It's super easy to make, and even easier to eat!


Azuki (Red Bean) Filled Mochi
adapted from Tiny Urban Kitchen

Ingredients:
1 lb sweet rice flour
1 cup sugar
1/2 teaspoon salt
2 eggs, beaten
2 cups and 1 tablespoon milk
1 egg yolk, beaten
2 cups azuki (red bean) paste

Directions:
1. Preheat oven to 350 degrees F and grease a 9"x13" baking pan.
2. In a large bowl, mix together flour, sugar, salt.
3. Add 2 beaten eggs and 2 cups milk into flour mixture and stir together until well combined.
4. Spread about half of the mochi batter into greased baking pan. Spoon the azuki paste on top of mochi layer and spread evenly. Cover with remaining mochi batter.
5. Whisk together egg yolk and tablespoon of milk to make egg wash. Brush top of mochi with egg wash.
6. Bake in oven for 60 minutes until golden brown.
7. Let cool 10-15 minutes then slice into squares.

Friday, January 28, 2011

Arpor's 90th Birthday

My favorite memories of my maternal grandmother (Arpor) revolve around her birthday. I seem to always visit Thailand in the summertime when it just can't get any hotter, and about once a decade, we celebrate Arpor's birthday in a big way with a family reunion. I don't know what your family reunions are like, or if you even enjoy them, but these reunions have always been a real treat for me. We feast on great food, and Arpor sits back as we perform endless acts of music* and dancing for our beloved grandma.


Flashback to 1991's family reunion. Oh boy.

I want to share with y'all some pictures from the latest family reunion celebrating Arpor's 90th birthday on July 3, 2010. These are mostly professional photos from the celebration in the Novotel Bangkok in Siam Square. Those who came numbered 200, making it a bigger party than my wedding. And as you'll soon see, we showered Arpor with our love through our musical acts.


Meet my dear grandma Sumitra Boonsermsuwong, or as I call her, Arpor.


The tables were named after her kids as they were all given tables to seat their own friends and family.


This is a fun fact I love telling people. Can you believe my grandmother gave birth to 11 children?! Here they are, happily reunited. Oldest to youngest from right to left. 7 live in Bangkok, 3 in the USA, and 1 is in Hong Kong.


And here's the entire family. Each of the 11 got married and had children. Some of those children got married and had children. In total, there are 69 of us in the family, spread throughout 5 different countries.


My beautiful cousin Dara performing a traditional Indian dance.


Some of the granddaughters join together in a hip-hop-fan dance.


My dad and Tim played Jim Croce's Time in a Bottle while food was served.


Singing to Arpor is a must-have act.


Three generations of daughters danced to the Girls' Generation HaHaHa song, choreographed by cousin Jent.


A 90th birthday is well-deserving of a tiered cake and mantou tower.


Birds' nest soup is a popular present for the elderly, believed to be a health tonic.


My paternal grandmother (Khun Ya) even came out, and I don't know what my oldest uncle is doing, but that's just classic behavior of our crazy uncle.


If you're wondering where the food pictures are, then you might be missing my point. While some memories involve food, this is about family itself. If I didn't snap this picture of the menu, I wouldn't have known what we ate that night. I know it all tasted great, but experiencing this kind of love beats even the best steamed garoupa [sic] in Bangkok.

*Wondering why the big emphasis on music and dancing at our family reunions? My grandfather had a deep love for music and performing, having led a big band for many years, and he sent his children to music lessons. He passed away in 1997, but we continue to honor him by displaying the love for music he passed down to all of us.

Monday, January 24, 2011

Grandmothers

Over the weekend, I attended the wake of our Poh-Poh, Ing-Fen Hsu Jeng, who died January 15, 2011 at the age of 85. Technically she's my husband's sister's husband's Poh-Poh (maternal grandmother), but I'm calling her Poh-Poh because she was a woman who loved everybody as her own family. I didn't know Poh-Poh terribly well, but I see and know the fruits of her love through her family. I'm thankful I had the chance to attend her and Gong-Gong's 60th wedding anniversary a few years back, and it was the sweetest celebration to join in, especially as a newlywed at the time.


A snapshot of their 1948 wedding.

One after another, family and friends relived stories about what a big heart she had towards others, and some of her grandchildren shared how they always found it weird that Poh-Poh never cooked for them (the cooking was Gong-Gong's job). Hearing these stories made it so sad to say goodbye, but we pray with great hope that God's mercy has brought her and Gong-Gong together again in eternity.

After coming home from the service, I immediately thought about my own grandmothers, and how fortunate Tim and I are to still be able to talk to and Skype with all four of ours today. And how happy were we to visit Thailand last summer to celebrate Arpor's (my maternal grandmother) 90th birthday and Khun Ya's (my paternal grandmother) 92nd birthday with them!

Having lived my whole life in the States with most of my extended family residing in Bangkok, I only saw my grandmothers once every 3 years at best. Still, I have many fond memories of them, and food plays an important part of those memories. I'll be posting a few of those memories (as well as new memories from this past trip) in a mini-series to come. In anticipation of those posts, I'd like to ask y'all...

What are some of your fondest memories of your grandmother(s)? I look forward to reading your stories!

Tuesday, January 18, 2011

Chocolate Banana Loaf


We had a wonderfully tiring weekend, visiting friends from all over. We drove over 700 miles, stopped in 5 different cities and met adorable baby Joseph, played with a bunch of little kids, chatted with a handful of college friends, had dinner with my old church small group, and even saw a few friends from our high school days. There were many more we wish we could have seen, but we're saving them for another trip.

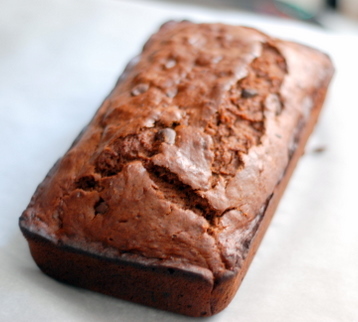
I made this chocolate banana loaf for Jon, one of the coolest friends we have. Thanks for hosting us and for treating us to some great soondubu! Glad you were able to eat some Sunday morning, and I hope you've enjoyed more since. :)

Among all the catching up, we were asked how our families are doing, and we heard some great compliments about our family members. Specifically, we heard from Tim's high school buddy how he recalls my mother-in-law, Mama, being the sweetest person he's ever met. Mama, I hope that you're reading this and that you realize you've touched many people's hearts with your love and kindness. Happy Birthday to my dear mother-in-law!


Chocolate Banana Loaf

Ingredients:
1 3/4 cups all-purpose flour
1/4 cup unsweetened cocoa powder
3/4 cup sugar
1 teaspoons baking powder
1/4 teaspoon baking soda
1/4 teaspoon salt
1/2 cup chocolate chips
2 large eggs
1/2 cup unsalted butter, melted
4-6 ripe bananas, mashed well
1 teaspoon pure vanilla extract

Directions:
1. Preheat oven to 350 degrees F.
2. Butter and flour the bottom and sides of a loaf pan.
3. In a large bowl mix the dry ingredients together (flour, sugar, cocoa, baking powder, baking soda, and salt)
4. In another bowl combine the wet ingredients: bananas, eggs, melted butter, and vanilla.
5. Fold the banana mixture into the dry ingredients until just combined. Then fold in the chocolate chips.
6. Pour batter into prepared pan. Bake about 60 minutes until bread has risen and a cake tester comes out clean.
7. Let cool slightly, remove loaf from pan, and serve warm.

Friday, January 14, 2011

Baba's Mantou 饅頭


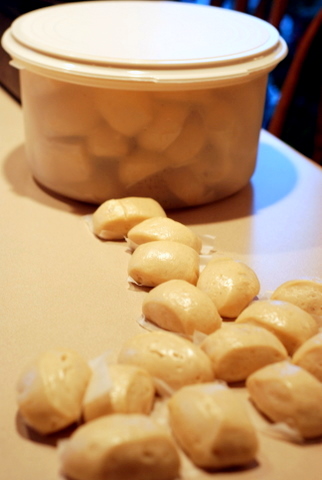
Happy Birthday Baba! It's my father-in-law's birthday today, and I'd like to take some time today to share one of his recipes with all of you. I had the pleasure of visiting Fort Wayne, IN for Christmas, and I was delighted to help my father-in-law makes these for the big Christmas Eve gathering their church held at their home. Christmas Eve is just one example of my in-laws' hospitality towards their community. I hear many stories of their lovely home gatherings, inviting over church friends, neighbors, as well as students from North Side High School (where my mother-in-law teaches), and I was blessed to participate in one of their parties during Christmas.


For our Christmas dinner, we doubled the recipe below and made close to 80 buns! I certainly pulled my weight in eating them up as I must have eaten at least a dozen during our time there. Thanks for sharing your recipe with me, Baba, and I hope to learn many more recipes from you!


Baba's Mantou 饅頭
makes around 40 buns

Ingredients:
3 tablespoons yeast
3 tablespoons sugar
4 cups warm water
1 tablespoon baking powder
12 cups all-purpose flour
1 tablespoon shortening
1 cup red bean paste
40 - 2" squares of cut wax paper

Directions:
1. Sprinkle yeast and sugar over the the warm water, let stand for about 30 minutes until yeast bubbles.
2. Meanwhile, mix together flour and baking powder, and cut shortening into flour mixture.
3. Make a well in the flour mixture, pour in yeast mixture, and start mixing to form a dough.
5. Knead dough on floured surface until smooth, then cover with moist paper towel and let stand for about two hour in a warm place until the dough doubles in size.
6. Punch down dough and knead one more time and let stand for another 20 minutes.
7. Prepare steamer and begin to boil water.
8. Knead dough to shape into long rolls and cut across the roll to form mantou.
9. To make red bean paste filled mantou, roll one section of dough into a flat circle, put 1 tablespoon of red bean paste in the center, and pinch dough closed, forming a bun.
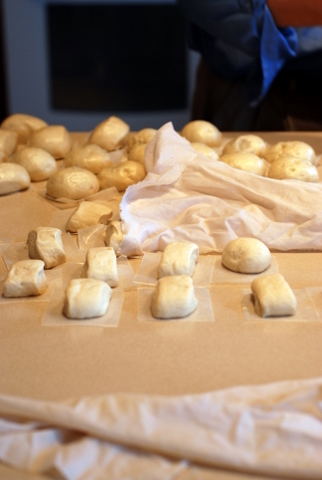
10. Stick one square of wax paper to the bottom of each shaped mantou and cover with damp paper towel until dough is used up.
11. Place mantou carefully in steamer, leaving enough space in between. Steam mantou for 10-12 minutes.

Monday, January 10, 2011

Alice's Tea Cup Cookbook Giveaway Winner

As you may have guessed, this post's purpose is to say, we have a winner for the Alice's Tea Cup Cookbook Giveaway! I modified my random dish generator to tell me who the lucky reader is. (That's the little spreadsheet I wrote to give me dinner ideas when I'm fresh out)

And the cookbook goes to...


Congratulations Michelle! You'd make a wonderful breakfast companion, and I hope you enjoy your copy of Alice's Tea Cup Cookbook! Please email me your mailing address at talidabakes at gmail dot com, and we'll send your copy out.

Thanks to everyone who participated this giveaway. I realized I have many favorite breakfasts as I read through each comment; I guess I don't discriminate when it comes to this much-loved meal.

Sunday, January 2, 2011

Alice's Tea Cup Peppermint Stick Scones and Cookbook Giveaway!


Like many others living in the New York area, I love Alice’s Tea Cup. I love their selections of scones and tea, I love the flavorful potato-chicken hash, and the sense of whimsy I feel each time I visit. When I read through Alice’s Tea Cup Cookbook, I was even more charmed to learn that many recipes incorporate tea as key ingredients!

*


I shared these peppermint stick scones with my in-laws while visiting Indiana for Christmas. They were the perfect biscuit for the holiday, and I’ll take any excuse to have candy for breakfast. I’d also love to share a copy of this cookbook with one lucky reader! Just leave a comment on this post, telling me your favorite breakfast to share with others. You have until January 9, 2011 at 11:59PM, EST. A winner will be picked at random. One entry per person, and giveaway is limited to US residents only.

*These may look more like doughnut holes than your typical scone because we shaped and baked them in mini-muffin pans. Following the cookbook’s recipe below will give you a classic scone shape.


Peppermint Stick Scones
makes 10-12 scones

Ingredients:
3 cups all-purpose flour
1/3 cup sugar
1/2 teaspoon baking soda
2 1/2 teaspoons baking powder
3/4 teaspoon kosher salt
3/4 cup unsalted butter, cut into 1/2-inch pieces
1 cup crushed Brach's peppermint Star Brites (or similar candy)
1 1/4 cups buttermilk
1 teaspoon pure vanilla extract
1/4 cup heavy cream (for brushing)

Directions:
1. Preheat the oven to 425 degrees F.
2. In a large mixing bowl, combine the flour, sugar, baking soda, baking powder, and salt.
3. With clean hands, work the butter into the dry mixture until it is thoroughly incorporated and has the consistency of fine breadcrumbs. Add 3/4 cup of the crushed peppermint candy and combine well, so that it is evenly distributed throughout the dry mixture.
4. Make a well in the center of the dry ingredients, and pour the buttermilk and vanilla extract into the well. Combine the ingredients until all the dry mixture is wet, but do not knead!
5. Turn the mixture onto a floured surface and gather the dough together. Gently pat the dough to make a rectangle about 1 1/2 inches thick. Using a dough cutter, cut the scones into wedges measuring about 3 1/2 x 4 inches, and lay them on a nonstick baking sheet. Gather the remaining dough together lightly to cut out more scones - just don't knead the dough too much.
6. Brush the top of each scone liberally with heavy cream, and sprinkle them with the remaining 1/4 cup crushed peppermint candy.
7. Bake the scones for about 12 minutes, or until lightly browned.

FTC Disclaimer: I received free copies of Alice's Tea Cup Cookbook to review/giveaway from HarperCollins Publishers.

Saturday, January 1, 2011

Happy 2011!

And just like that, it's January 1, 2011.

*


In addition to wishing y'all a Happy New Year, I'd like to take a moment to wish this little blog a Happy 4th Birthday. Or are we calling them blogiversaries? Whatever we're calling it, it's been 4 years of documenting my baking adventures with lots of breaks in between. I've said this before, but my resolution for the year is to blog more. And this year I really mean it. I want to share more kitchen creations as well as food experiences with y'all. I love the food blogging community, and I want to stay active among a great group of people. I still have a pile of posts from last year to publish, so I'll be working through those first.

I'll spend the next couple days organizing my thoughts and photos, but I plan on kicking the year off with an exciting giveaway tomorrow, so stay tuned!

*Tim and I didn't really celebrate this blogiversary with a cake; that was one of his birthday cakes from this year, and the photo was taken by Josh, an old Texan buddy of mine who's living in NYC for the year!

Friday, September 3, 2010

Summertime

And just like that, summer is [edit: almost] over. I’ve had quite an adventure the past couple months, and I feel like I owe you all an explanation for my silence. Maybe I don’t owe you an explanation, because that makes it sounds like I’ve done something very wrong, but I’d like to reconnect with you as a reader of this blog. I appreciate that some of you check in with me and ask, “Have you been baking?” which I usually respond to by spewing excuse after excuse why I have not been baking. If you’ve asked me that question this summer, you might have gotten one (or all) of these answers:

“I’m going to Thailand!”
“I’m in Thailand!”
“I’m jet lagged!”
“I’m busy preparing for a company conference!”
“I’m at a company conference!”
“We’re getting ready to move!”
“We’re moving!”
“Well, we haven’t moved yet, but my stuff is in storage!”

That is the rundown of my summer. Tim and I flew to Bangkok for a family reunion, celebrating both of my grandmothers’ birthdays and eating nonstop. I’m saving those juicy details for another post. Right before we traveled to Southeast Asia, we found an apartment we love in Long Island City and signed a contract to buy it. And because our plans don’t always work out accordingly, we had to vacate our previous apartment before closing on the new apartment. Where am I living now, and where is my stuff?

Well, my gracious sister-in-law and her husband are letting us stay with them until we close, and our stuff is packed away in storage. We’re lucky to have them in our lives, and it’s been a lot of fun staying with them. Our two-week-long slumber party has consisted of playing Mafia II (Tim is really good at action-adventure games by the way), watching Mad Men, Skyping our parents, and most fun of all, playing with the silliest Yorkie-Poo I’ve ever met.

It’ll be bittersweet when we do close on our new place. I’ll get back to baking and you’ll see more posts from me, but then I won’t have a family of four to cook for, and I’ll also have to say goodbye to this adorable little guy. Woof!