Showing posts with label scones. Show all posts

Wednesday, March 30, 2011

Maple Frosted Pumpkin Scones

These days I've been so busy NOT baking, I haven't had a lot of baking material to write about. I'm happy to say that's not the case today.

I covered the Bloggers' Cupping Event at The Coffee Foundry earlier this month, and I want to share with you all what I was happy to share with the bloggers at the event.
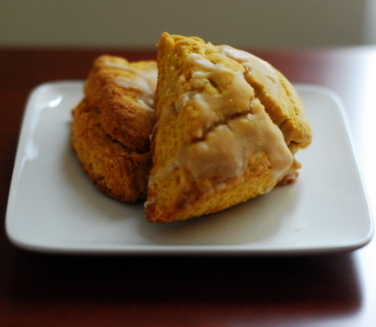


These maple frosted pumpkin scones. Well, until the day arrives we can send real food through the Internet, I'll just be sharing my recipe with y'all. I'm sorry I can't send over a warm scone to you right now, but if you have some time on your hands this weekend (and don't we all have tons?), I highly urge you to consider making these delicious scones. And if you do, let me know how they turn out!

Maple Frosted Pumpkin Scones
adapted from previous recipe

Ingredients:
3 cups all-purpose flour
1/3 cup sugar
2 1/2 teaspoons baking powder
3/4 teaspoon ground cinnamon
1/4 teaspoon ground ginger
1/4 teaspoon ground nutmeg
1/4 teaspoon ground allspice
3/4 teaspoon kosher salt
1/2 cup cold butter, cut into 1/2-inch pieces
1/2 cup buttermilk
1 cup canned pumpkin
Maple Frosting (recipe below)

Directions:
1. Preheat the oven to 425 degrees F.
2. In a large mixing bowl, combine the flour, sugar, baking powder, spices and salt.
3. With a pastry cutter, work the butter into the dry mixture until it is thoroughly incorporated and has the consistency of fine breadcrumbs.
4. Make a well in the center of the dry ingredients, and pour the buttermilk and canned pumpkin into the well. Combine the ingredients until all the dry mixture is wet. Be sure not to knead.
5. Turn the mixture onto a floured surface and gather the dough together. Gently pat the dough to make circles about 1" thick and around 4" in diameter.
6. Using a knife that's been run through cold water, cut the circle of dough into 6 wedges, and lay them on a baking sheet covered with Silpat or parchment paper.
7. Pop scones in freezer for 15 minutes prior to baking.
8. Bake scones for about 20 minutes, or until lightly browned.
9. Place baked scones on drying rack and drizzle with maple frosting.

Maple Frosting

Ingredients:
1 cup butter
1/2 cup brown sugar
1/2 cup granulated sugar
1/2 cup heavy cream
1/2 cup powdered sugar
1 teaspoon vanilla

Directions:
1. In a small saucepan melt the butter, brown sugar, granulated sugar and heavy cream.
2. Bring mixture to a low boil, then turn off heat.
3. After syrup has cooled down, whisk in powdered sugar and vanilla until reaching a smooth consistency.

Sunday, March 13, 2011

Bloggers' Cupping Event at The Coffee Foundry


I know I already mentioned it the other week, but I'll say it again. I'm proud to be friends with coffee geeks Norm and Wilson, and I want others to know what they're doing at The Coffee Foundry is very cool.


A couple Saturdays ago, Esther of Ambitious Deliciousness and I held a Bloggers' Cupping Event at The Coffee Foundry to do just that. We invited a few bloggers to come out and experience what coffee cupping is all about. What happened exactly? Norm led us through a sensory journey as we sniffed and sipped their coffee in different stages it went through from bean to drink.


I had the pleasure of supplying breakfast for the event, which included pumpkin cardamom scones, pecan coffee cake, Greek yogurt parfaits, and fruit salad. Visit back because I'll be posting the scone and coffee cake recipes!


During the cupping, we tasted a Brazilian Cerrado and an Ethiopia Sidamo and were asked to describe the aroma, acidity, body, flavor and finish in terms like carbony/nippy/fat/rough. Luckily we were supplied with a whole glossary of terms to choose from (because I wouldn't normally describe the taste of coffee as nippy or fat), and those terms were just among dozens of others.


We learned about all that goes into the science of brewing coffee well. New to me was the fact that ground coffee blooms when hot water is poured over just as it should if the grounds are fresh. Also, speaking to freshness of coffee, Norm taught us about the Rule of 15. The Rule of 15 refers to three rules about coffee:

1) Green coffee should be roasted within 15 months of harvest, or it goes stale.
2) Roasted coffee should be ground within 15 days of roasting, or it goes stale.
3) Ground coffee should be brewed within 15 minutes of grinding, or it goes stale.


Coffee geeks might already know that rule, but it was new to me. I think I can speak for most of the attendees that we all learned a significant amount about coffee last Saturday. It's easy to overlook the complexity it can take to arrive at your daily cup of coffee, so participating in a coffee cupping was a refreshing way to understand the precision (and balance of art and science) in making a good cuppa joe.


The Coffee Foundry is having special promotion for blog readers! Get $1 off any beverage when you mention "Foundry Coffee Cupping" upon ordering. This promotion is good until April 15, 2011. And if you're interested in participating in future cupping events, either comment below or send me a quick email.

And a big thanks goes to Albert Cheung Photography for supplying the photography for this post!

Sunday, January 2, 2011

Alice's Tea Cup Peppermint Stick Scones and Cookbook Giveaway!


Like many others living in the New York area, I love Alice’s Tea Cup. I love their selections of scones and tea, I love the flavorful potato-chicken hash, and the sense of whimsy I feel each time I visit. When I read through Alice’s Tea Cup Cookbook, I was even more charmed to learn that many recipes incorporate tea as key ingredients!

*


I shared these peppermint stick scones with my in-laws while visiting Indiana for Christmas. They were the perfect biscuit for the holiday, and I’ll take any excuse to have candy for breakfast. I’d also love to share a copy of this cookbook with one lucky reader! Just leave a comment on this post, telling me your favorite breakfast to share with others. You have until January 9, 2011 at 11:59PM, EST. A winner will be picked at random. One entry per person, and giveaway is limited to US residents only.

*These may look more like doughnut holes than your typical scone because we shaped and baked them in mini-muffin pans. Following the cookbook’s recipe below will give you a classic scone shape.


Peppermint Stick Scones
makes 10-12 scones

Ingredients:
3 cups all-purpose flour
1/3 cup sugar
1/2 teaspoon baking soda
2 1/2 teaspoons baking powder
3/4 teaspoon kosher salt
3/4 cup unsalted butter, cut into 1/2-inch pieces
1 cup crushed Brach's peppermint Star Brites (or similar candy)
1 1/4 cups buttermilk
1 teaspoon pure vanilla extract
1/4 cup heavy cream (for brushing)

Directions:
1. Preheat the oven to 425 degrees F.
2. In a large mixing bowl, combine the flour, sugar, baking soda, baking powder, and salt.
3. With clean hands, work the butter into the dry mixture until it is thoroughly incorporated and has the consistency of fine breadcrumbs. Add 3/4 cup of the crushed peppermint candy and combine well, so that it is evenly distributed throughout the dry mixture.
4. Make a well in the center of the dry ingredients, and pour the buttermilk and vanilla extract into the well. Combine the ingredients until all the dry mixture is wet, but do not knead!
5. Turn the mixture onto a floured surface and gather the dough together. Gently pat the dough to make a rectangle about 1 1/2 inches thick. Using a dough cutter, cut the scones into wedges measuring about 3 1/2 x 4 inches, and lay them on a nonstick baking sheet. Gather the remaining dough together lightly to cut out more scones - just don't knead the dough too much.
6. Brush the top of each scone liberally with heavy cream, and sprinkle them with the remaining 1/4 cup crushed peppermint candy.
7. Bake the scones for about 12 minutes, or until lightly browned.

FTC Disclaimer: I received free copies of Alice's Tea Cup Cookbook to review/giveaway from HarperCollins Publishers.

Sunday, May 11, 2008

Happy Mother's Day!


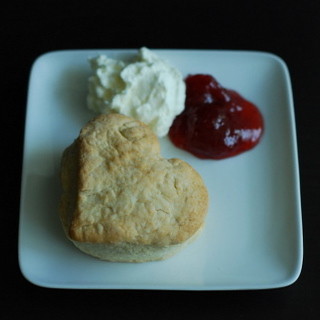
This year is a special Mother's Day because I now have two mothers to celebrate! Some could find that bothersome, but I am so lucky to have a great mom and a great mother-in-law. They both are great examples of godly women, and I want to follow in their examples. Mama (Tim's mom) has treated me like her own her daughter from the start, and has encouraged me with words of wisdom and by always letting me know she's keeping me in prayer. Mom (my mom) has the kindest heart and I definitely get my desire to be hospitable from her. Since we could not celebrate with them in person, I decided to send them scones and jam to enjoy this morning - Tim and I would do the same, so we would all be celebrating together in spirit. (I didn't send the crème fraîche because it wouldn't have kept so fresh.) Happy Mother's Day to my two beautiful moms, and to the rest of the mothers out there!

Sweet Milk Scones
from Cook's Illustrated March 1994

Ingredients:
2 cups unbleached all-purpose flour
1 teaspoon cream of tartar
1/2 teaspoon baking soda
1/2 teaspoon table salt
1-2 tablespoons granulated sugar
4 tablespoons butter, chilled and cut into 1/2-inch pieces
3/4 cup whole milk

Directions:
1. Adjust oven rack to middle position and heat oven to 450F degrees.
2. Sift first 5 ingredients into large bowl. With 2 knives cut butter into flour mixture until mixture resembles coarse meal with a few slightly larger butter lumps.
3. Make a well in the center of mixture and pour in milk. Working quickly, blend ingredients together with a rubber spatula into a soft, slightly wet dough. Turn dough onto a well-floured work surface.
4. Quickly roll dough to 1/2 inch thick. Use a lightly greased and floured 3-inch biscuit cutter to stamp dough with one decisive punch, cutting close together to generate as few scraps as possible. Dip cutter into flour as often as necessary to keep dough from sticking. Push scraps of dough together so that edges join; firmly pinch edges with fingertips to make a partial seal. Pat this remaining dough to 1/2 inch thick; continue to cut 3-inch rounds.
5. Place dough rounds 1 1/2 inches apart on a greased baking sheet. Bake until scones are lightly brown, 10 to 12 minutes. Serve immediately.

Crème Fraîche
adapted from Cook's Illustrated Sept 2003

Ingredients:
1/4 cup sour cream
1/4 cup heavy cream
pinch of salt
1 teaspoons sugar

Directions:
1. Whisk sour cream and heavy cream in bowl; set aside at room temperature until thickened to the consistency of yogurt, about 1 1/2 hours.
2. Just before serving, stir in salt and sugar.